
I have been trying to get in to Age of Sigmar for years! MAYBE with the advent of 4th edition this might be my way in to the setting.
It also gave me a reason to finally get ALL of the Vampires that I’ve been picking up over the years “because they’re too cool not to!” out on the painting table and assembled in to some sort of cohesive army.
As always, here’s me documenting the journey and talking about models, painting and hobbying, as I inevitably always will do.
Armies of The Old World!
The Old World is here! And with it comes all new army rules, compositions and heroes. I get very excited reading new rules and planning new armies while I’m doing it, so when Games Workshop sent me all the army lists I had to review a few of my favourites and those that get me excited to plan an army!
Return to the Desert!
Tomb Kings are finally back in Warhammer, being released for The Old World!
I’m more than excited about this release and on this page are all my ramblings, planning, building and painting of my new Tomb Kings army!!
Thanks to Games Workshop for the initial review copy of the army box and rules pdf! I hope you enjoy, and please forgive the very excited reviews!

Photos


Soon!
The ‘clear my phone’ update post!
Yup, it’s literally that! I’ve taken photos of all the models I’ve been working on, converting and painting and posted a few of them up on Twitter, but I’ve left them on my phone because ‘Oh I’ll write a blog post about them later’.
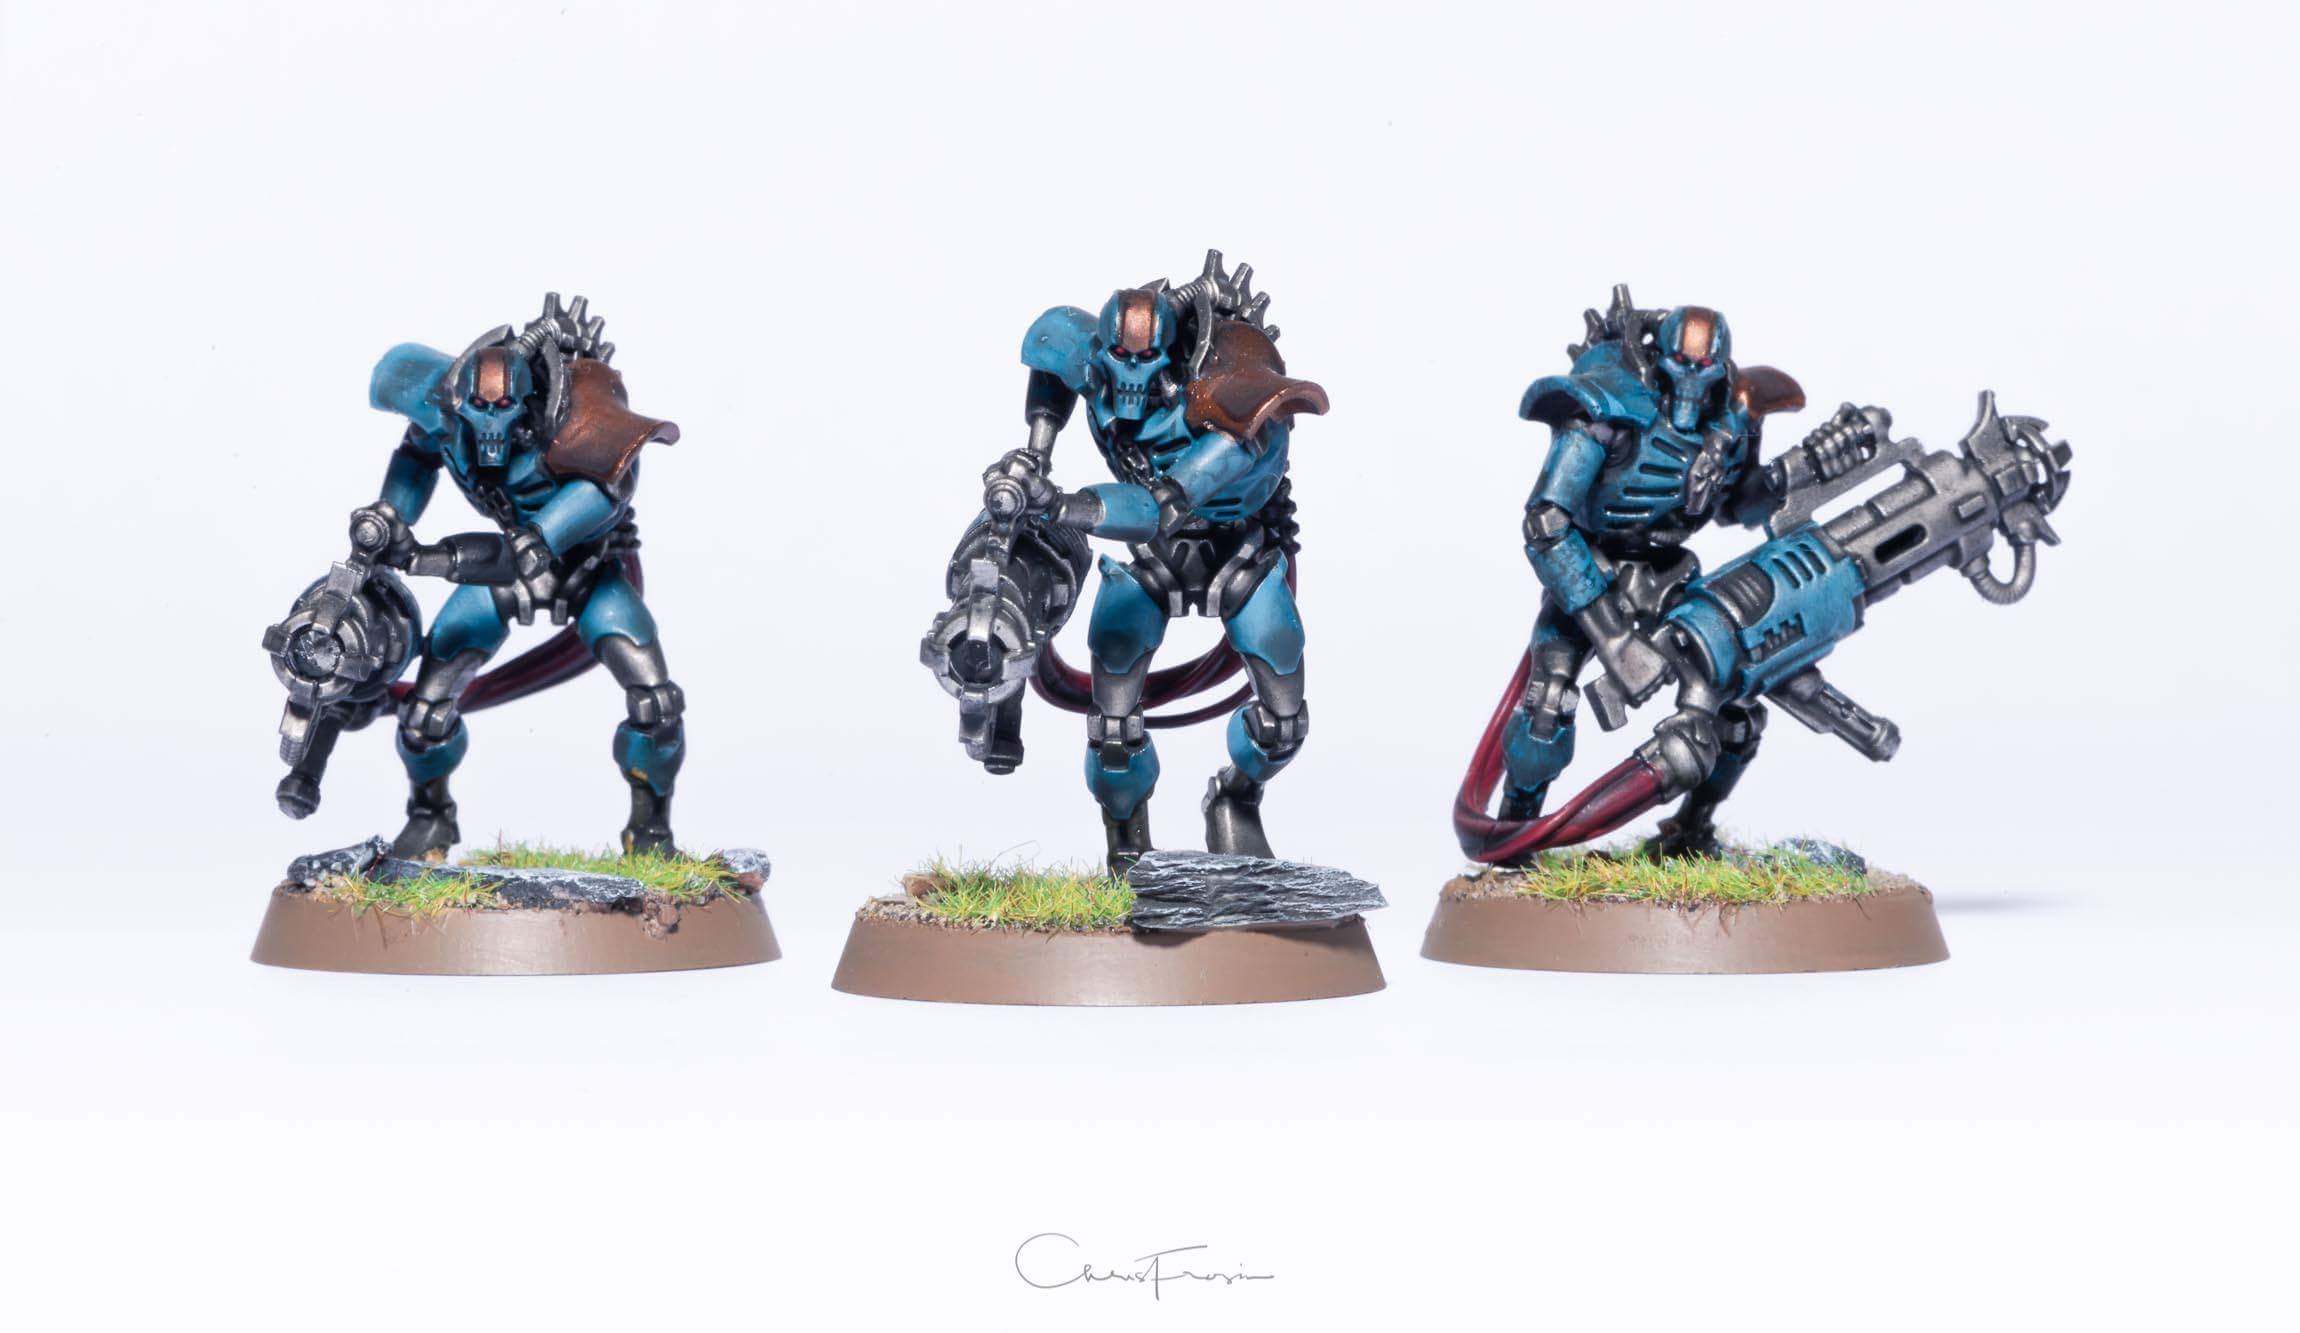
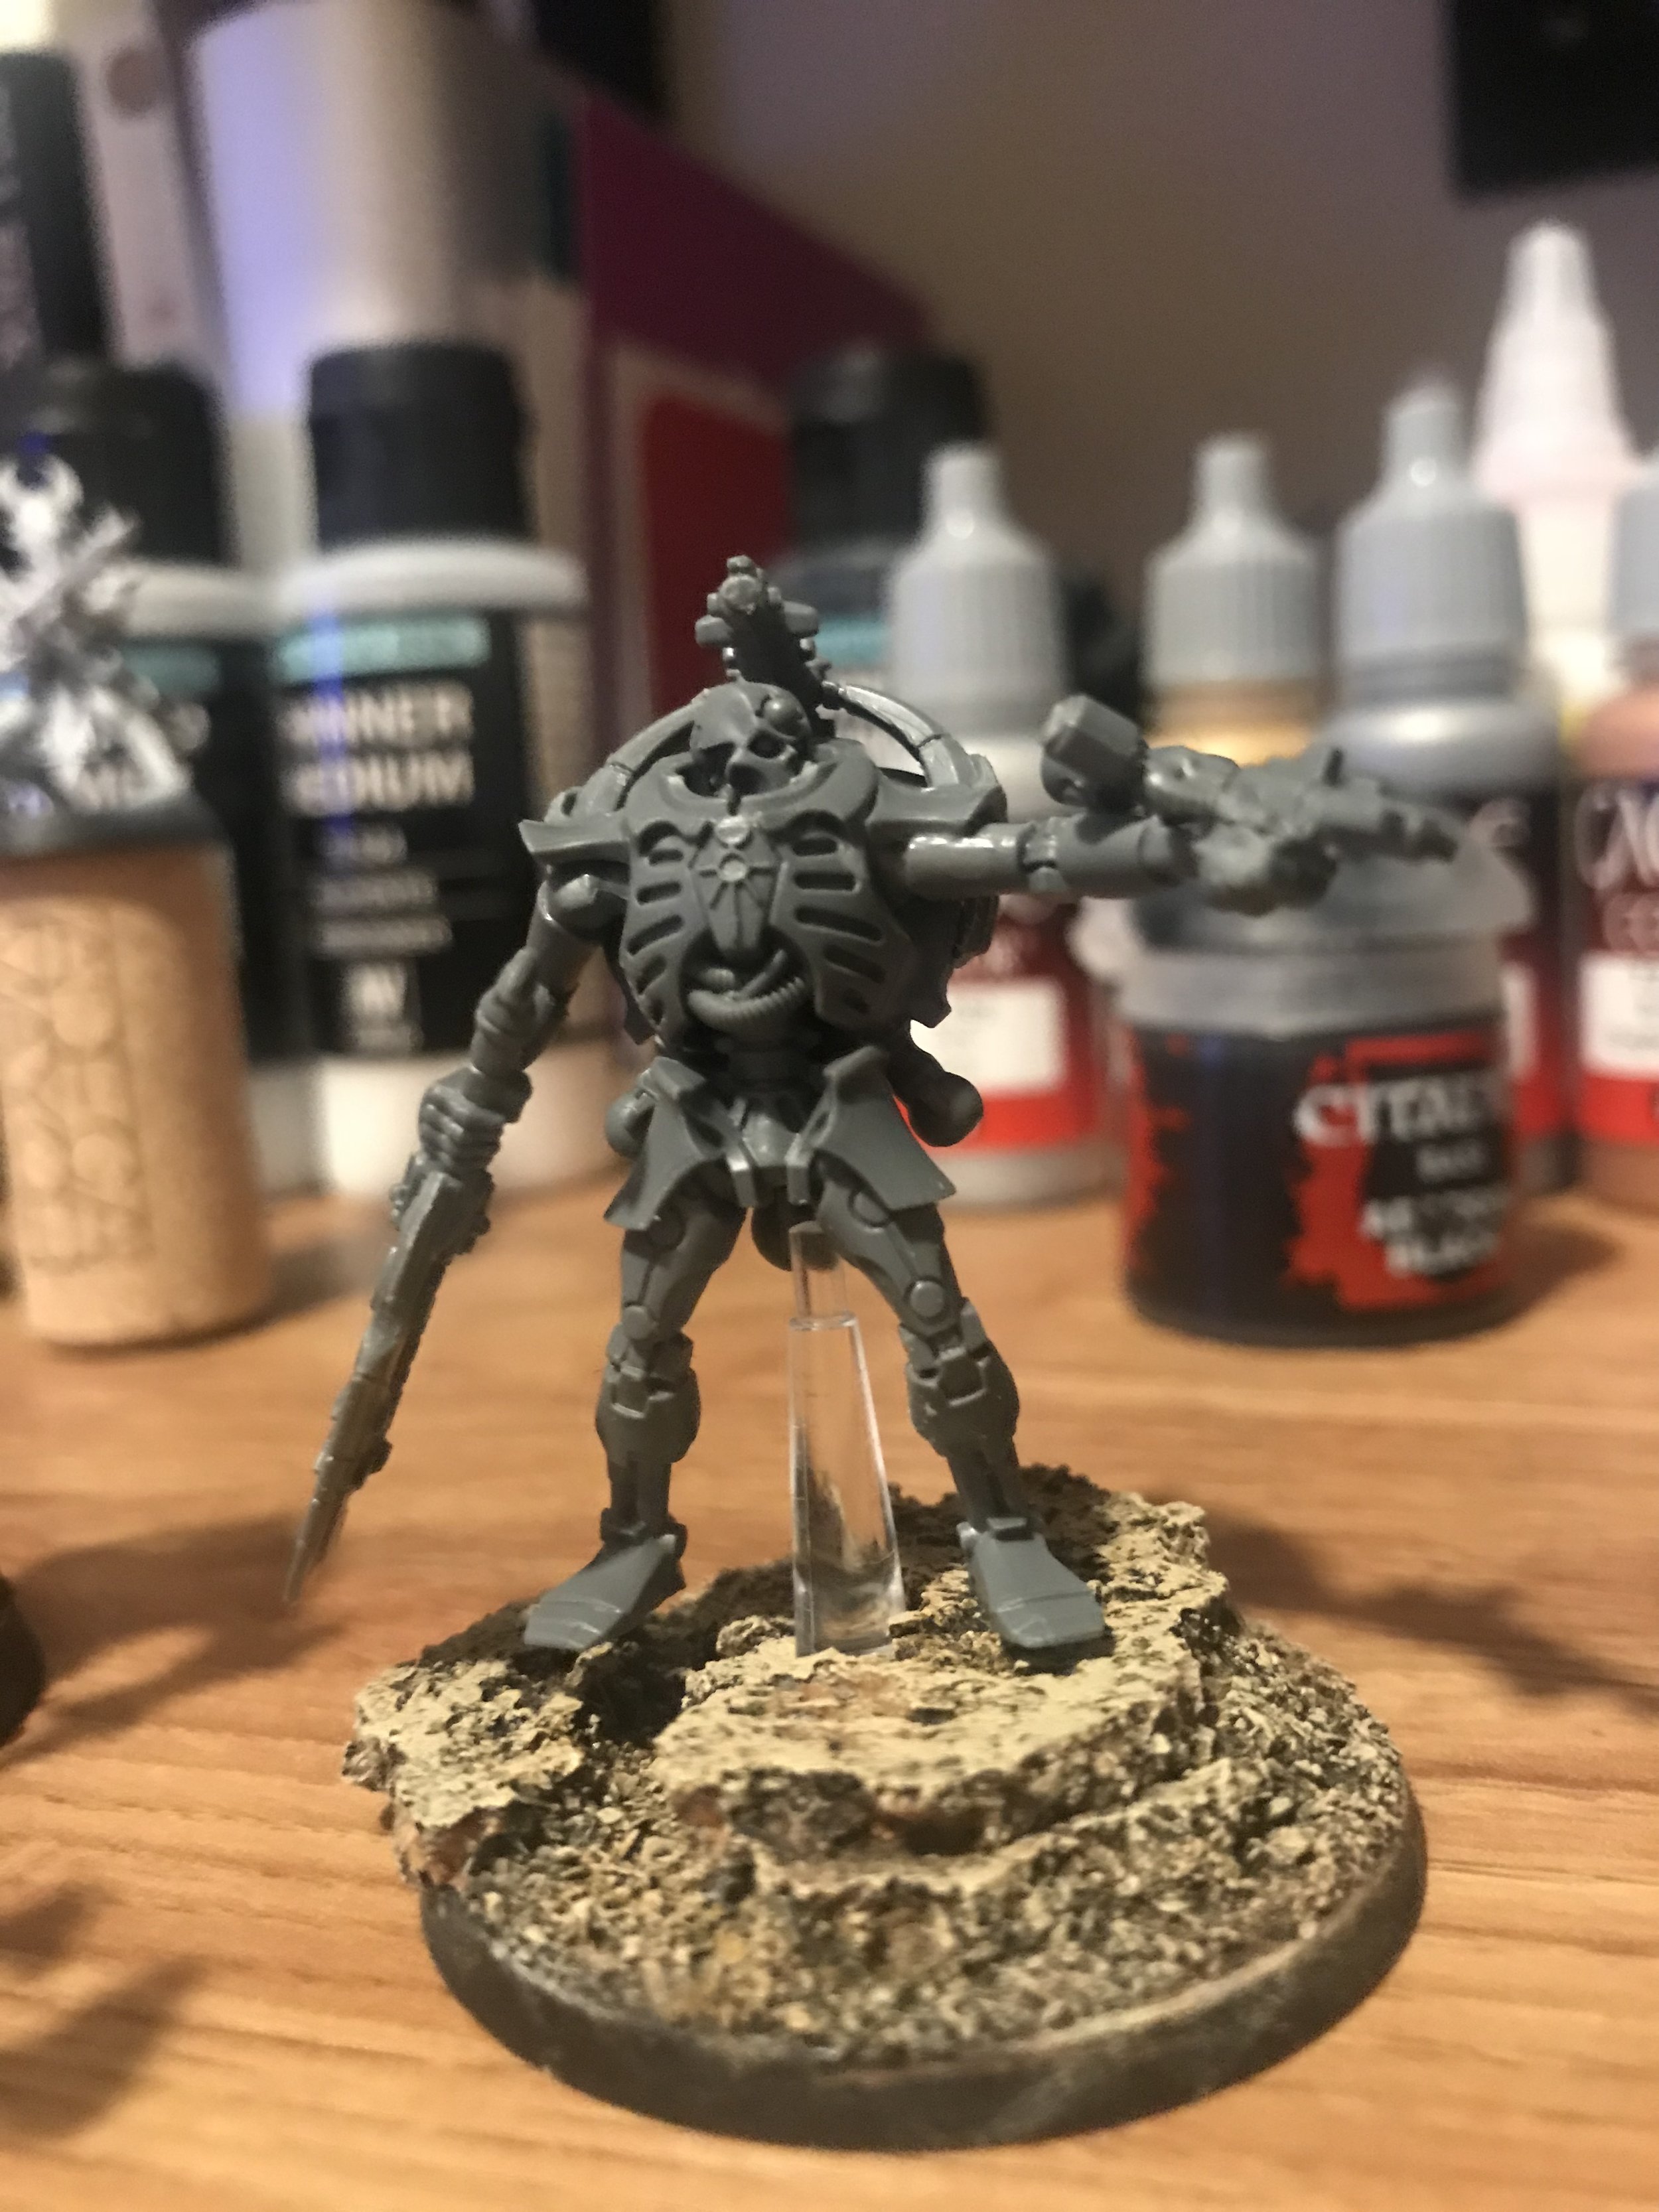
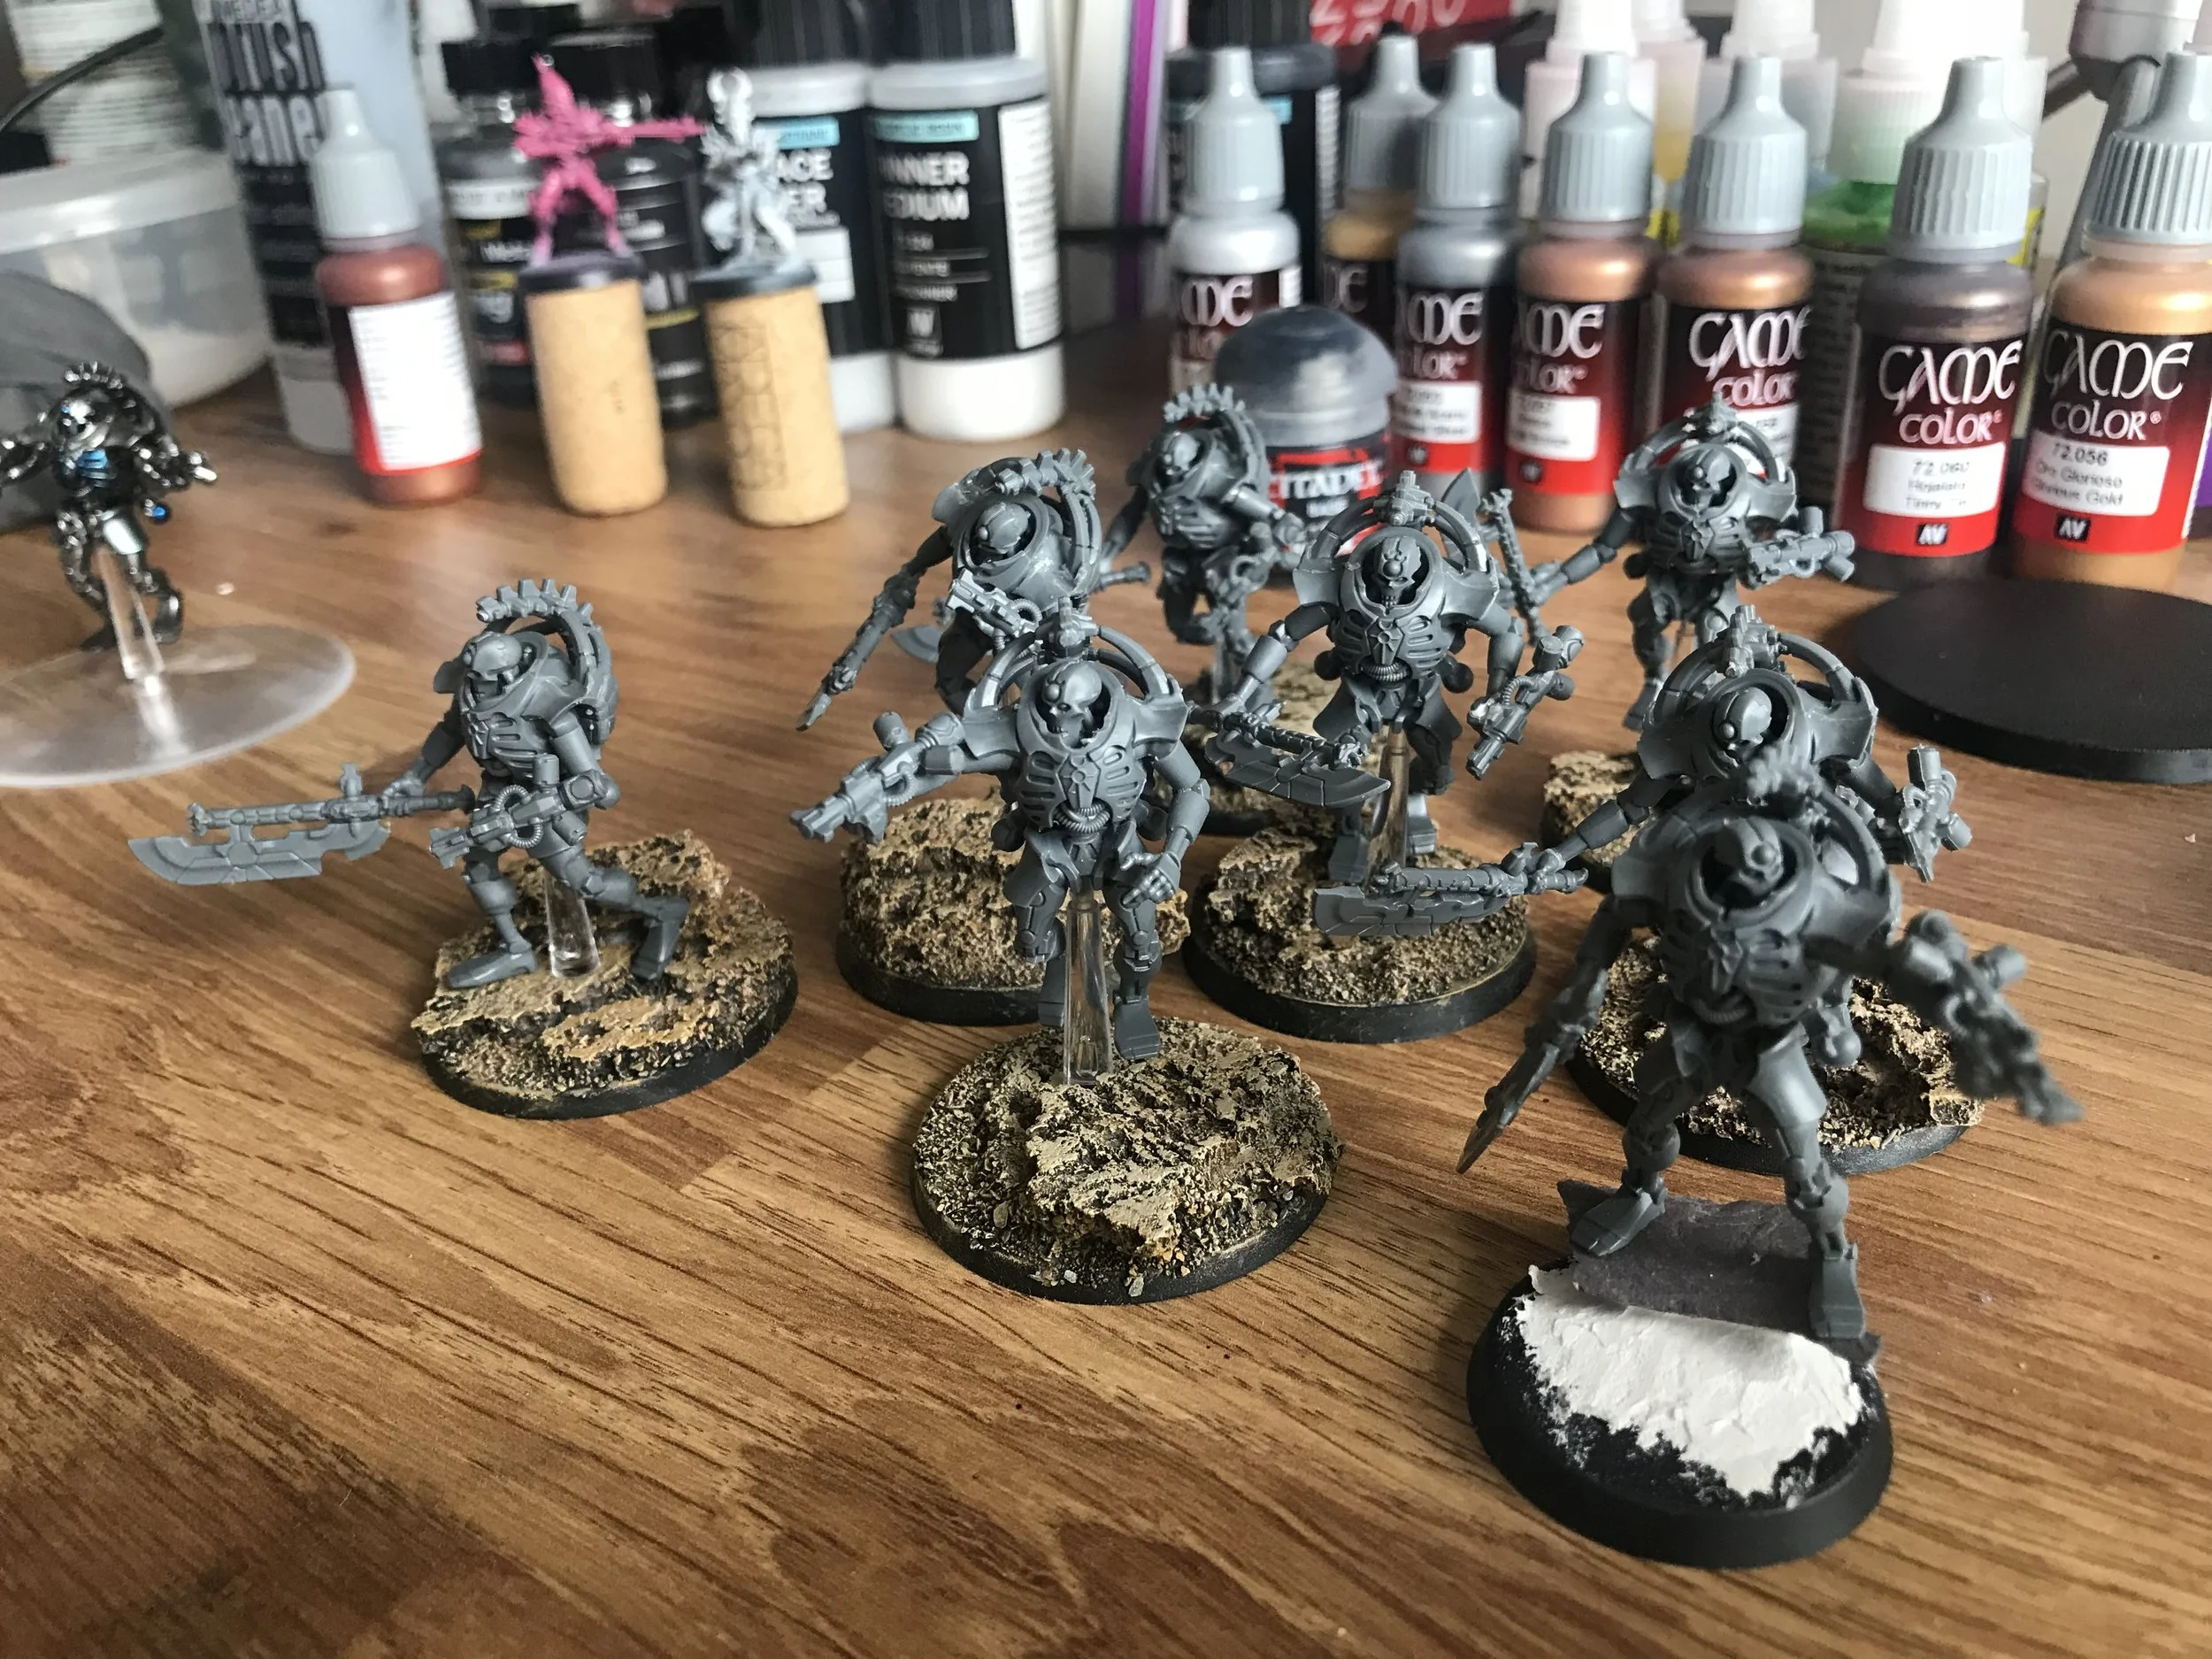
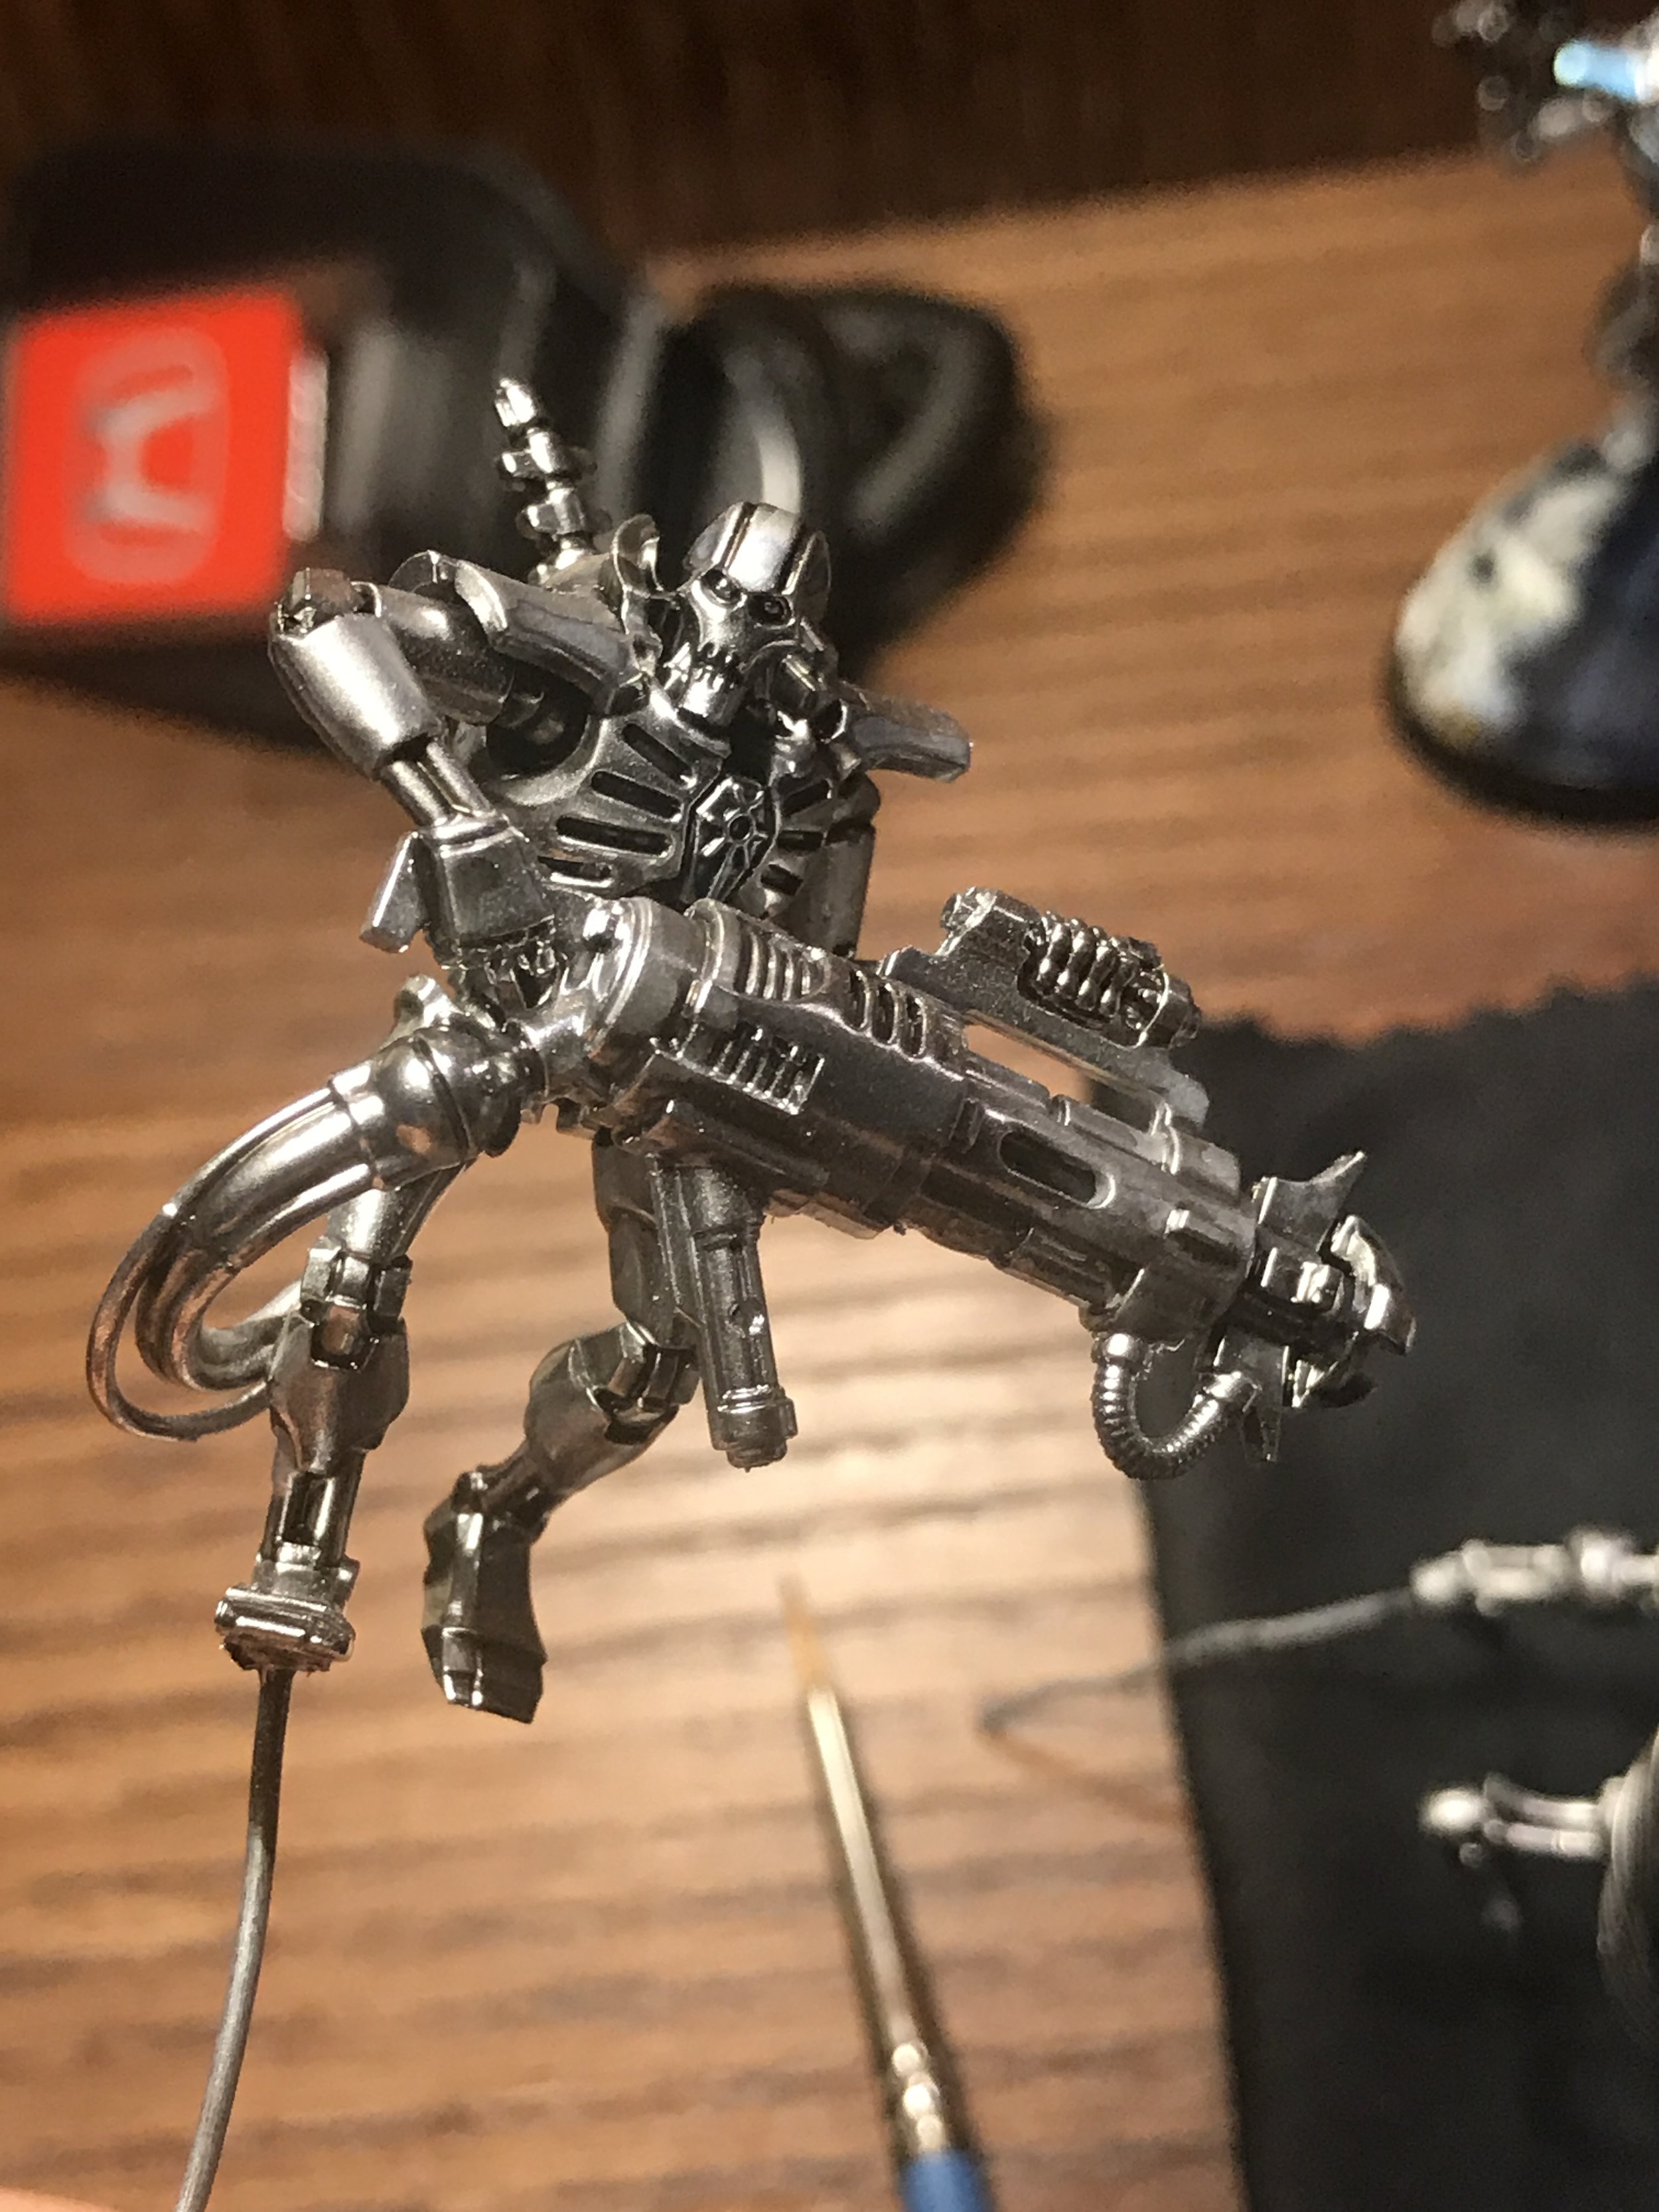
First up are the Necron warriors. I really need to add them to my force as a backbone and I’ve a feeling they’re going to be even more important when the Codex lands. Strategems and traits are important to be made use of and I can see the relentlessness of Necrons becoming a big part of this. Cinematically there’s just something about lines of Necrons advancing on their foe that has to be tapped in to.
However, the Necron warrior models are... shall we say struggling in the recent flourish of phenomenal sculpts coming from Games Workshop so I’ve had to take them a different direction. It means a lot of cutting and glueing but the end result... you can be the judge of but I like them a lot right now.
It starts with cutting both legs off. Each leg is then either cut in two and ‘bent’ or veeeeeery gently striaghtened out. Most of the time it would still snap and the break would need cleaning up and glueing back together but I probably managed 60% of them without snapping.

Right leg cut and bent in to a ‘run’

Left leg bent up and forward as if mid step
There’s soooo much variety you are then able to put into the poses however the joints that are cut and glued do have a very small cross section. The ankle for instance, always needs to be repositioned as it needs to be pronated out. I probably went too far on some, cutting the toes off for an even more ‘mid-step’ pose.

Toes cut off and repositioned for a stride
Once all the angles and repositioning had been done I did drop a small sap of superglue on each joint just to help add a little strength. The plastic glue I use (Slaters Mekpak) does do an brilliant job and is very strong but I just wanted to make sure. With the superglue there’s very little flex in the joints.

The resulting torso is a much more satisfying vertical position
The ‘new’ position seems to automatically give the torso a more vertical pose (the one in the photo is maybe a fraction too vertical) but they look much more imposing when they’re together. The vertebrae needs to be one disc taller now the Necron is standing up straight and a slice of plastic rod does just the trick.
One more vertebrae is added in now that the warrior isn’t hunched over

So much taller!
I was planning on using my custom tinted gauss rods but realised that with all their recent (recent for me) sculpts, Games Workshop we’re steering away from the coloured rods so I had a think.

Gauss blaster power cores used
I had a lot of Gauss Blasters from my Immortals spare - in my opinion Tesla Carbines are better for Immortals, plus the kit makes Deathmarks, too - so it didn’t take long to cut some up, and see if they fitted.

They’ll do nicely!
After doing twenty of these weapons and for a little variety and unit differentiation I then made these guys!

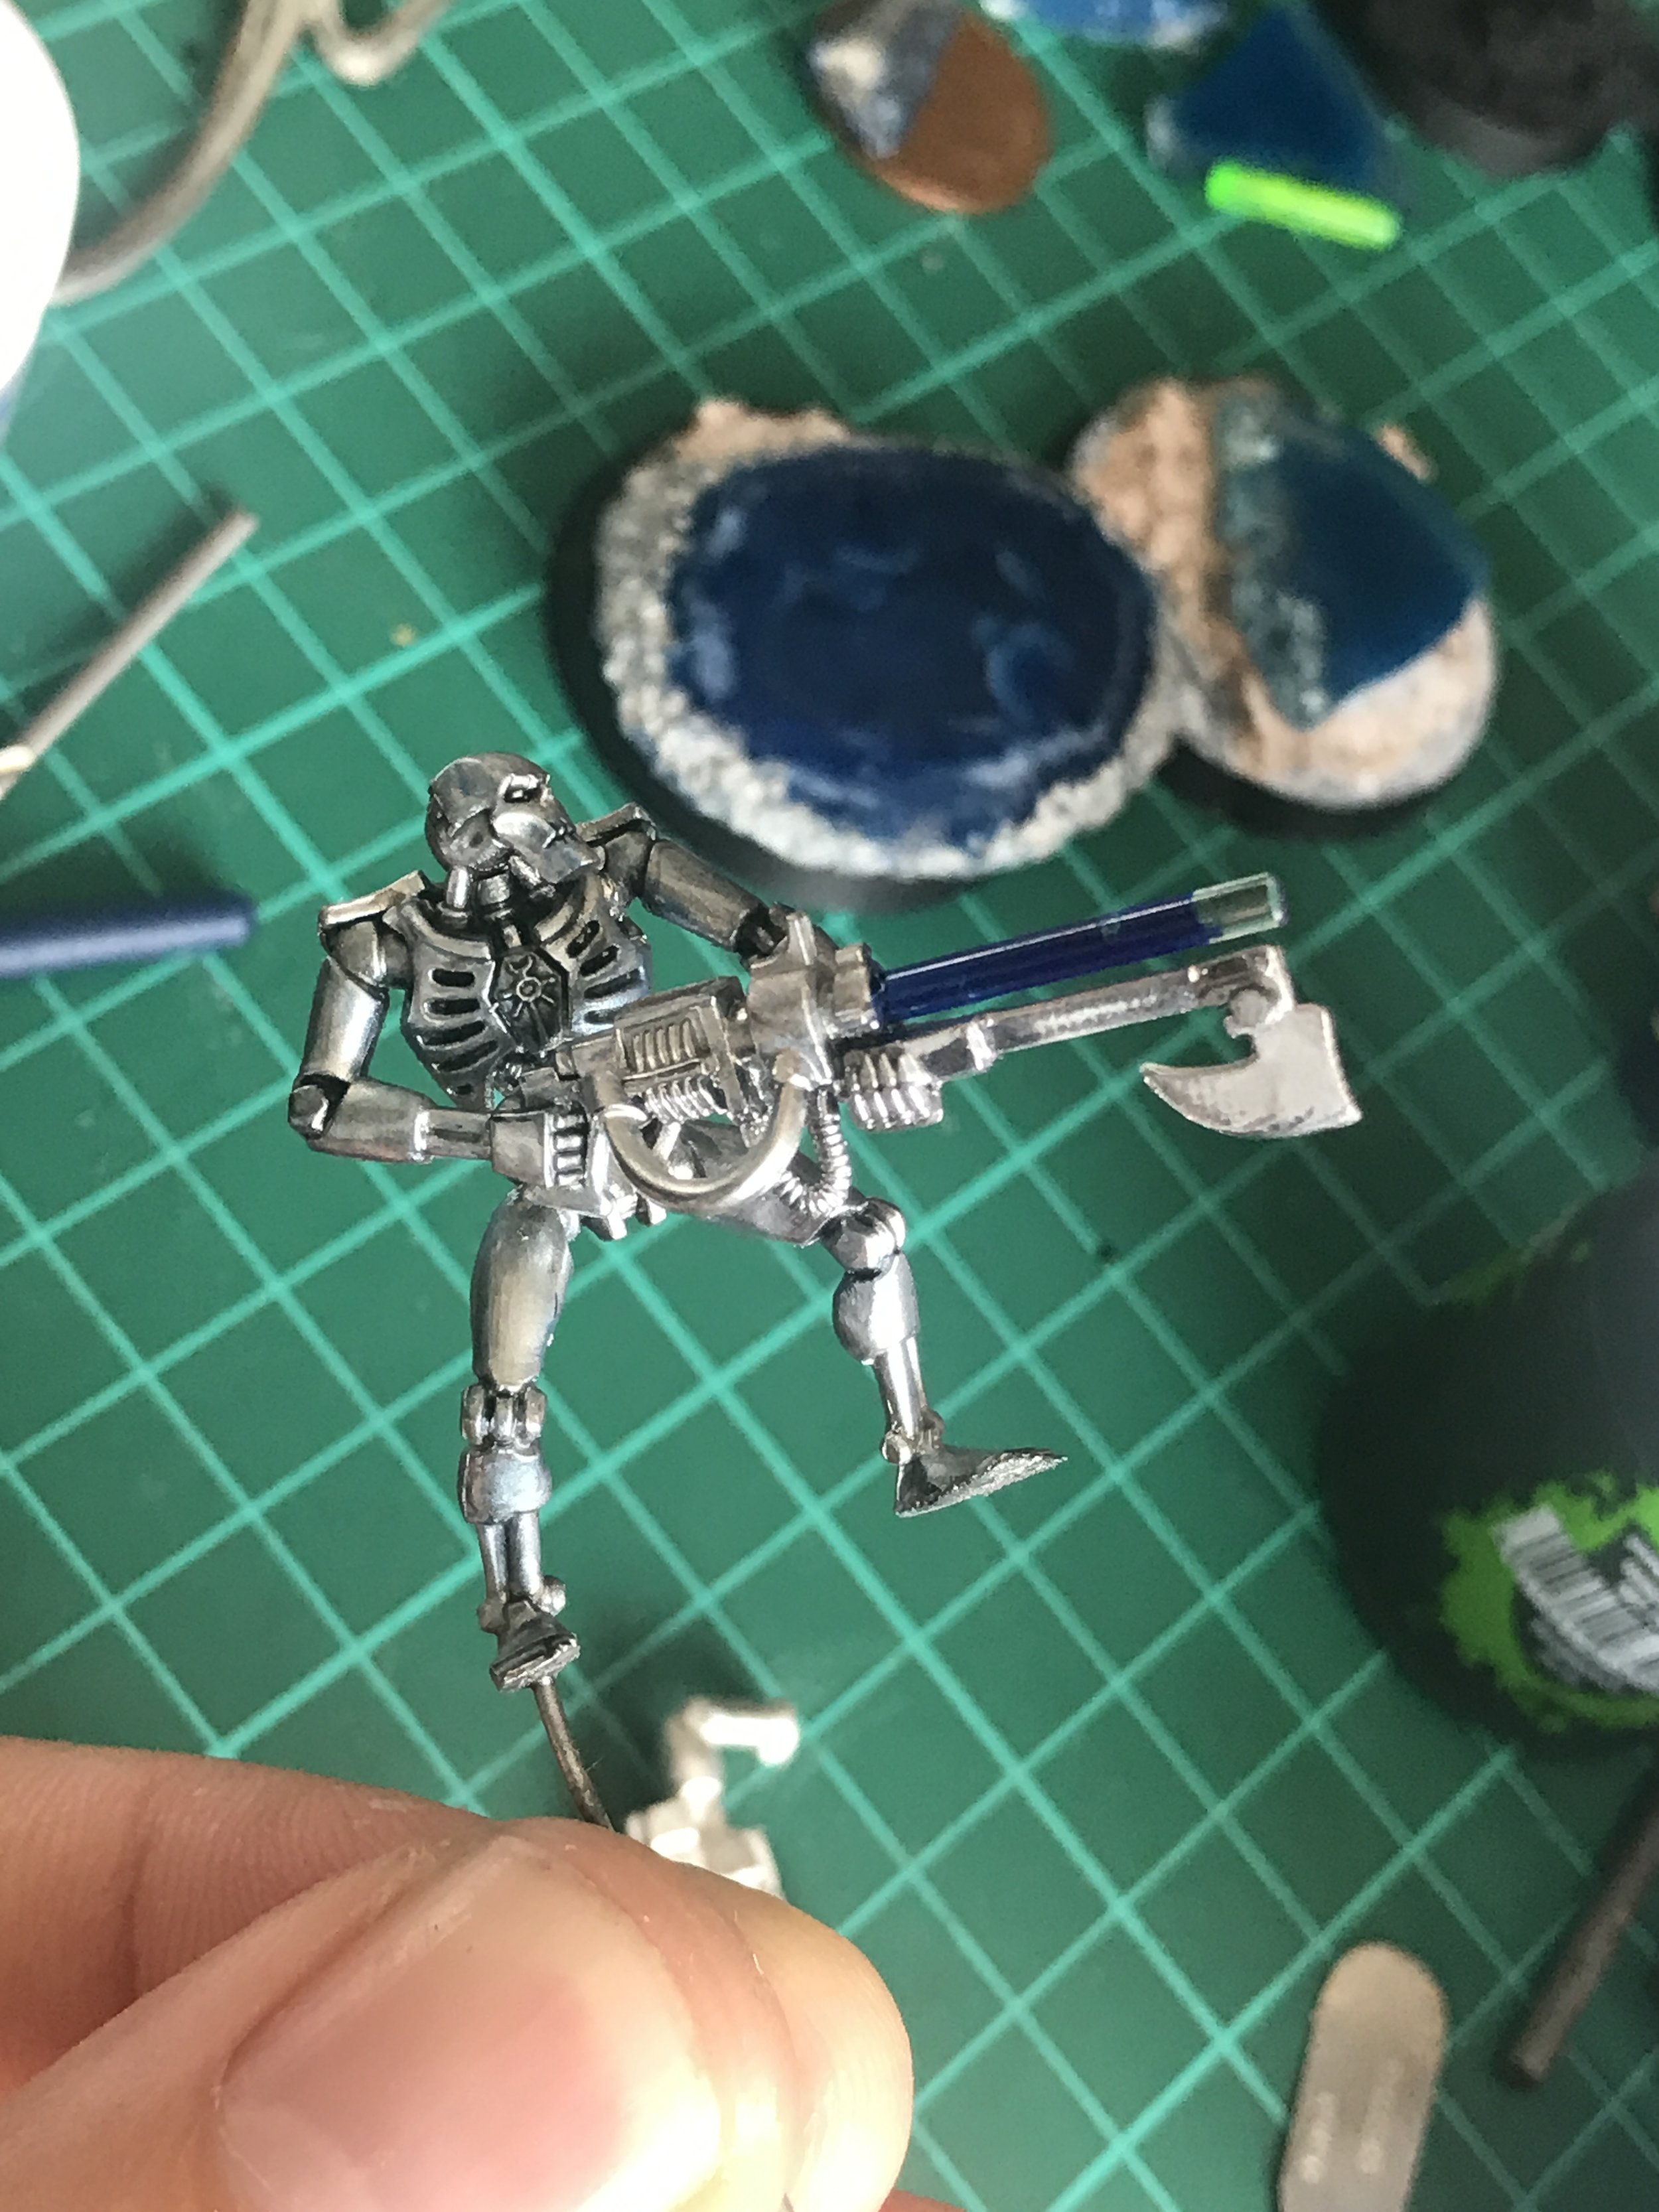
Necron warrior with a Deathmark power core in his Gauss Flayer
I think he’s still very much a Necron Warrior but looks just a little different. I made a unit of ten of these to go with the twenty strong unit of the others.

You can see how much more dynamic you can make the warriors look with careful use of a sharp knife
So update done, I can now clear these photos from my phone and will collate the next batch to share with you later this week.
What do you think to the warriors? I know I probably shouldn’t have given them two different weapons but maybe in the Codex we get some more variety, who knows. Although if we get variety in Necron warriors that will almost certainly mean new sculpts which will invalidate all this work, haha!
I’ll leave you with a few more photos and until next time, take care, have a great build up to Christmas and keep painting!

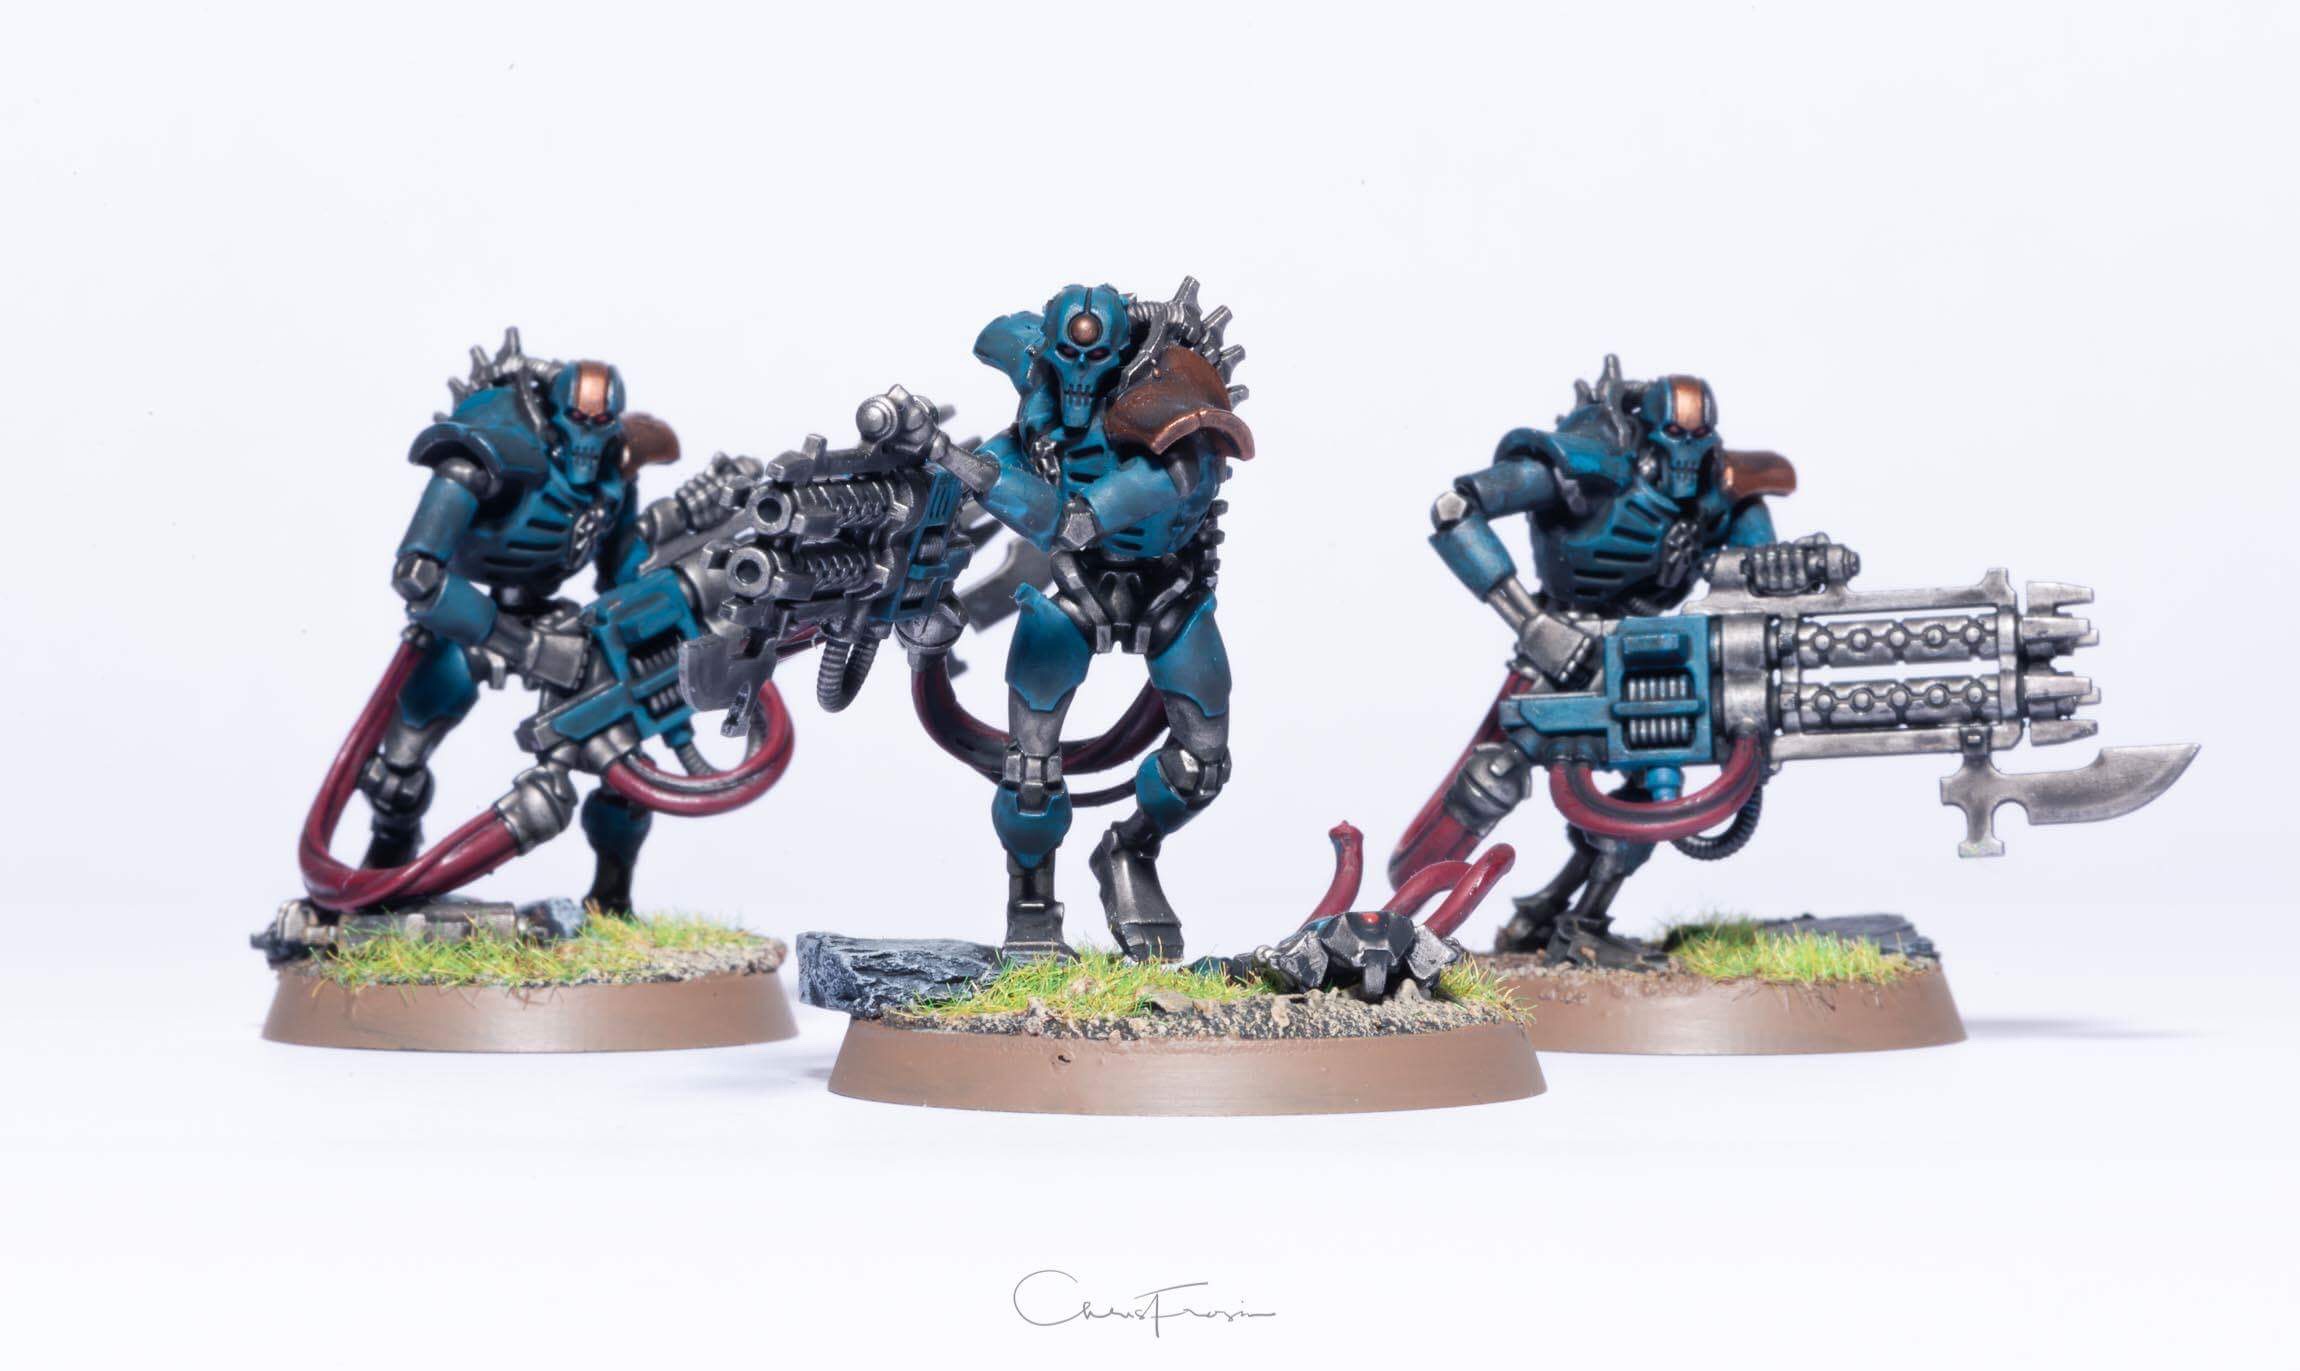
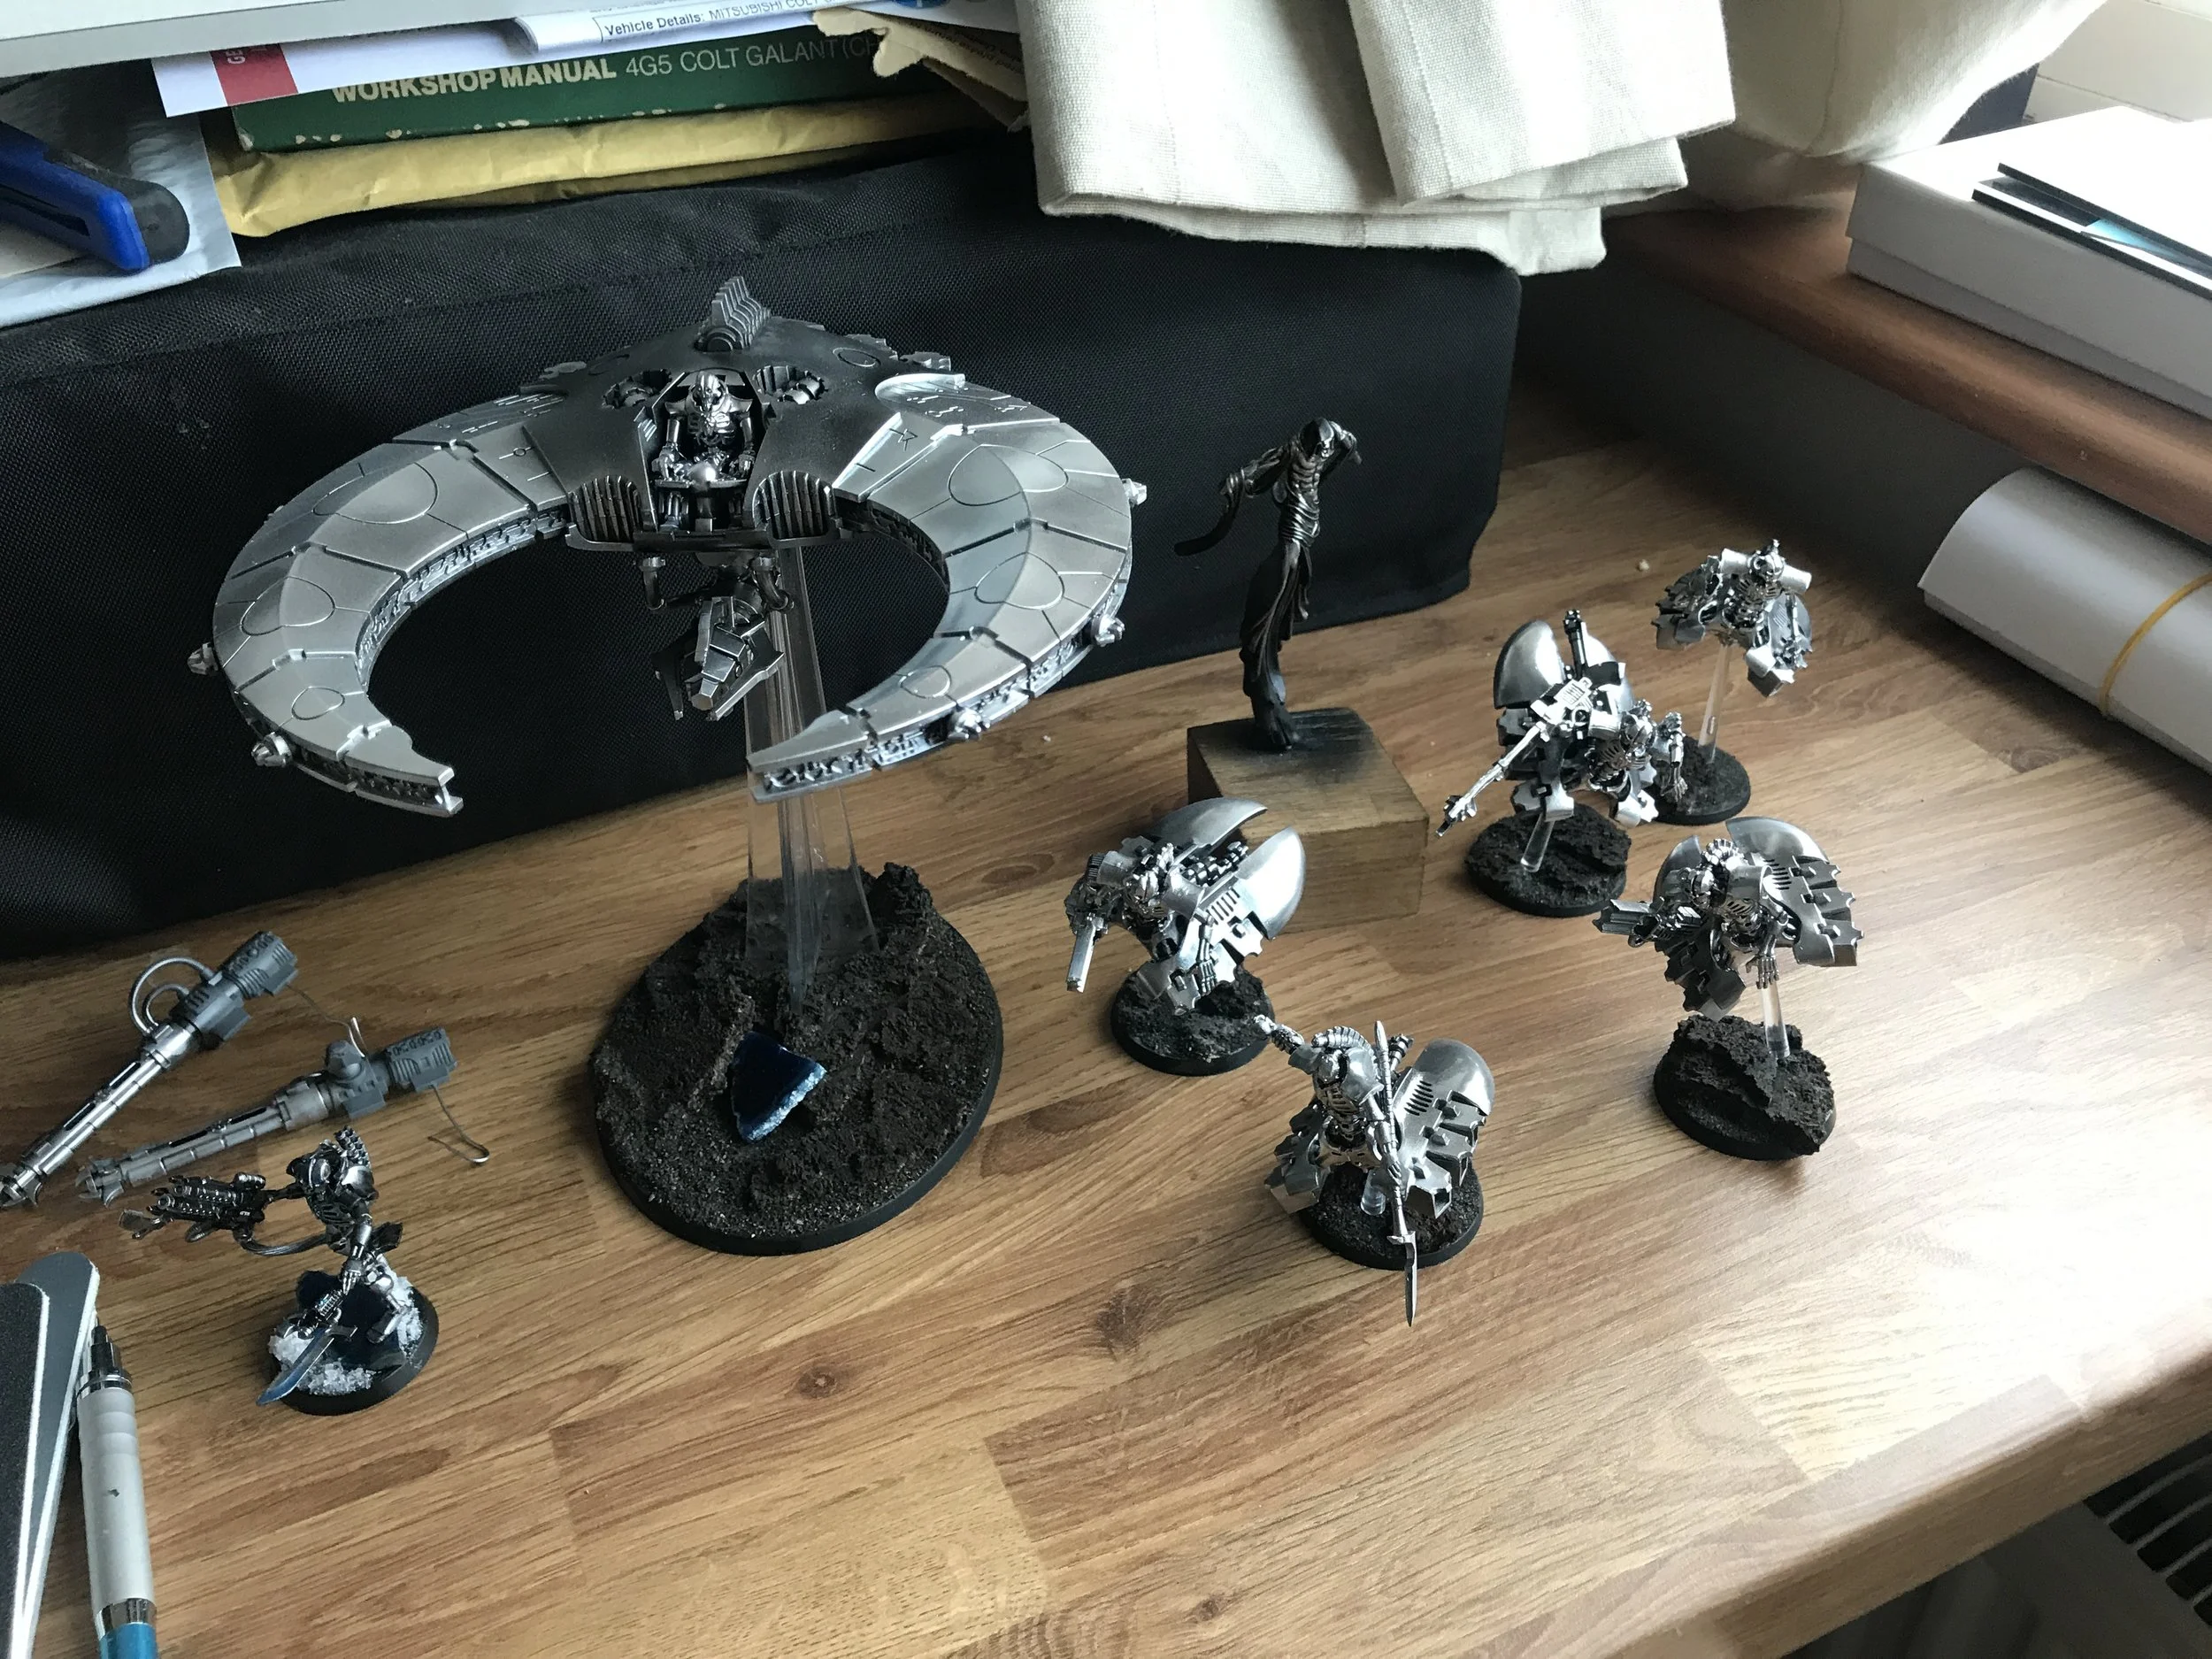
All the warriors lined up with some custom scarab swarms!

A little magnet under each base and they sit nearly ranked up in my carry case. Yup, they stay where they are when carried vertically

And my favourite photo of them so far! It’s official, they’re taller than a Primaris Marine!
Thanks everyone! See you soon and I’ll definitely retake that photo when they’re chromed up! Love it.
Chris

Coming next time...
The Most Complete Paint Job
Chrome really is everywhere on my painting table right now. So much so that I’ve completely cleared the area and have just left out five to eight models I’m ‘working on’ at that moment in time to keep it clear and tidy. A little ocd coming out maybe, but a) it doesn’t look quite as daunting and b) I don’t like painting on the edge of a huge table, tidy up and use all your space - I’d rather put in the time and effort and do things properly, something that has become more and more evident in my photography over the last few years.

Since the last post I’ve been chipping away at the painting in my spare time, Twitch streaming it here and there and have got to stage now where I’m very comfortable and happy with the colour scheme, the technique, the paints and how to apply them. It’s maybe taken a little longer than I anticipated to get this nailed down but I think it has been worth the wait.
Let’s get you up to speed.
I left you last post after converting what felt like a million tiny little robot hands, swords and worst mounted pistols on to the Praetorian models. Once they were all done I had to decide how to base them. I couldn’t understand how the Necron ‘jump pack’ troops didn’t have the little flying bases that you found with the Space Marines or the Ork Stormboyz. I wanted to get some semblance of them flying and toyed with a couple of different ways to show that.

I thought about using the flying base but couldn’t quite make it look right with certain poses

Tried a custom rod for a little extra height and a different profile but still didn’t quite like it the models stood

Ultimately I went with a small wire in one of their feet. This could be hidden once based properly with a little static grass
The wire in the foot gave me a few different looks and feels that I liked. I could have some of the poses a little higher when that worked, whereas the more dynamic ‘striding’ poses could be dropped much lower so they were almost hovering. The second foot being totally clear of any support totally added to the illusion.
Easy to match the wire size to a drill size so I dropped a hole and a wire in each foot and set all the models up on corks ready for their chrome.

With a few spare parts I also made up an Immortal Champion model... just because
The chrome paint application I’ve nailed down to getting two thin coats of gloss black down reasonably quickly, about 15 to 20 minutes between coats.
The first coat of chrome is then put on very lightly on the shadowy underside of the model and left to cure just a little. The lacquer dries very quickly and can be sprayed over almost instantly but takes a little longer to cure properly. Another 15 or 20 minutes and a light coat from the top ‘highlighting’ the model, again not putting it on too heavily. I find I like the look when there’s plenty of shadow in the finished chrome look before I add that with a wash. Putting it on quite lightly gives a black chrome look that can be built upon slowly. One more coat picking out the chest plate and shoulder pads and we’re ready to take them to the paint table.

That’s the hard bit done. Once they’re back on the table it’s a case of washing some nuln oil in the recesses and then the fun part, Blue!

Nuln Oil brings out the contrast

The flying effect with the wire is very evident here, and I’ve done a little work on their bases, too
The blue is probably my favourite part to paint. It’s the Soulstone Blue technical paint from Citadel and over this chrome it’s fantastic! I build it up slowly with just a light hint over the area I’m ‘staining’ before building it up stronger.

You can see the stain build up here as I work across the chest plate
Never thought I’d get the blue exactly how I had in my head when I first envisioned this colour scheme. This rich a blue is perfect and so striking when you line all the models up.
Before I show you the finished line up there’s the matt black contrast to add on to certain areas, the particle caster, the blades and the jump pack ‘ribs’.

I feel the black adds some great contrast to the shiny chrome
So once that’s all done here’re all the models finished and lined up ready for their addition to the Armies on Parade board, which, by the way, I’ll be working on this coming weekend!


And just to tease you another pic before I post some of the board updates, here’re all the models done so far all neatly standing in the newly hung cabinet!


I’ll be live on my Twitch channel working on one last model before starting the board over the weekend, so if you’re free on Thursday or Friday evening, get your paint pots out, a cup of tea, and come and hang out with me www.Twitch.tv/ChrisFrosin
See you anon!
Chris
Convert. Convert Everything!
I’ve been working on the Destroyers and finishing up the Destroyer Overlord over the last few days but yesterday thought I’d finally turn my attention to assembling all the million Praetorians I’ve got. They’re going to be a large part of the Armies on Parade force, adding a good weight of numbers and if the one I’ve painted up is anything to go by, will look suitably shiny and hopefully impressively intimidating.

All Praetorian parts laid out ready to decide what to do
The wargear options for the Praetorians is a tough choice. Not really having played many games their options are very much a six of one, half a dozen of t’other as they could have S6 pistol with no AP that they can fire in combat too, and then a S5 -3 AP melee weapon. Or a S5 -3 AP gun and melee option. Ultimately, and this is a running trend with me, I liked the look of the Particle Blaster pistol being strapped to their wrists the most. So the choice was Particle Blaster and Void Blade. Which then gave another ‘meh’ moment; I don’t like the Void Blade model.

From top to bottom, the Rod of the Covenant shaft, Void Blade, left arm, right arm, Hyperphase Sword and Particle Caster
In my head as long as the Praetorians were wielding the Particle Caster, any Blade type weapon in their other hand would look like a Void Blade. My favourite from all the other weapons are the Hyperphase Swords. Easy! Have them wield those and the Particle Blaster.
It would be easy, if the weapons weren’t both right handed. I never seem to end up taking the path of least resistance!

From top to bottom, right handed Particle Caster, left hand trimmed down from the Rod of the Covenant shaft, left hand, right hand, Hyperphase Sword
All the parts were mostly easy to trim down with a fresh Swan and Morton scalpel blade and a nail file and the right hand on the underside of the Particle Caster was just as easy to trim off with some side cutters.

Easy to see the hand trimmed off with the left hand ready to go on
All the parts just needed patient and careful cutting down and sanding slowly. Unfortunately I took a little too much off one left hand but I hid that by tucking the arm up in the torso so the hand and joint to the Particle Caster was hidden a little. Rinse and repeat and about an hour later I had all the models done in different poses.

Five left handed particle casters done in this pic, and the broken, damaged Necron Warrior I converted for Dave’s AoP board crawling in at the top

One example of my Particle Caster and Voidblade setup
Now, the last part of the build for me is to have the models mounted ‘flying’. They have the FLY keyword and they’re effectively jump pack troops so I think I’m going to mount them on a small wire from under one foot so they’re not just walking along their bases.
Heres a few more images of the finished unit. I honestly cannot wait to get these primered, chromed, shaded and stained up to match the rest of the force. These may end up being one of my favourite units in my army!
Classic pose!

Just a Particle Caster on this one, just to change it up


And just to tease you... here’s the one finished model that the rest will be matching! Yes it’s a John Woo Double Wrist Mounted Pistol Wielding Undead Space Robot! Because!

Until next time have a great weekend, everyone, find me on Twitter and let me know what you’re working on. Having been away from the hobby for so long I’m absolutely loving seeing everyone’s work and projects!
See you all anon!
Chris
Golden Chroming
How many titles can I get chrome in to, really?
A speedy quick update for you all today as I've had a little time today to get some paint on the Destroyer Overlord I've been working on.
The more I spray this, the more little tricks and techniques I'm practicing and trying, the more excited I get about the finish and the look of the miniatures.
You no doubt saw the converted Destroyer Overlord in the last couple of posts and over the last few days when I've had a few minutes I've been polishing the flat surfaces.

3200 grit is about as fine as I'll worry about going
One of the most important parts of the chroming process is the preparation of the model. A good shine to the chrome comes from a smooth gloss black primer which in turn comes from a smooth plastic surface (or in the case of the C'Tan, smooth white metal surface. That took an aaaaage to polish!) .
I have a number of varying grade abrasive pads and nail files for this ranging from 180 (mostly used for flattening sprue gates and bad mould lines) up to 8000 (barely ever used but I did give this Overlord a final rub down with 8000 grit... just to make sure). Up to 400-600 is usually absolutely fine for regular areas on the Necrons like their shoulder pads.
This evening I moved my airbrush down to the garage and set it up ready to get some paint going on. It was just too windy to take it outside. I will usually spray up in my office/hobby room but with the chrome paint being a lacquer it's important to get a little more ventilation than just opening a window. I open three windows and the main door to get a good air flow through the garage.

Airbrush had a clean before spraying tonight - I use an Iwata Revolution BR
Airbrush had a quick clean to ensure the paint would flow as best it could and I grabbed a couple of extra models including a little Immortal Chosen conversion I did. I'll use him as my Shadow Wars Kill Team leader and just as a Champion-esque model for a squad of Immortals in my Warhammer 40,000 army.

Airbrush, paints, thinners and cleaner and the models ready to be sprayed

The Immortal Chosen having its first coat of gloss black primer
It's important when spraying the larger models that the last coat is over the most important part so the underside is done first. The important last coat was to be the rear of the Destroyer body.

Underside had a couple of thin coats of the primer. It dries very quickly so it's easy to apply slow thin coats

Very thin and light coats were built up in the depths of the Destroyer body. Notice I haven't touched that rear body section yet.

Slowly building up the coverage. The torso and head are next.
I made sure I applied the primer from above and below to avoid missing any crevices

And that is why I polished the plastic whenever I had a spare few minutes. That shine will translate in to a great smooth chrome finish.

Gorgeous smooth wet and deep finish
That is exactly the finish we need as a base for our chrome. And that was next up. I left it to flash for a little over 30 minutes so that I could get a good black chrome finish to shade the model before a final full shine over certain areas when it's fully cured tomorrow. Areas like the shoulder pads, ribcage and that rear body section.

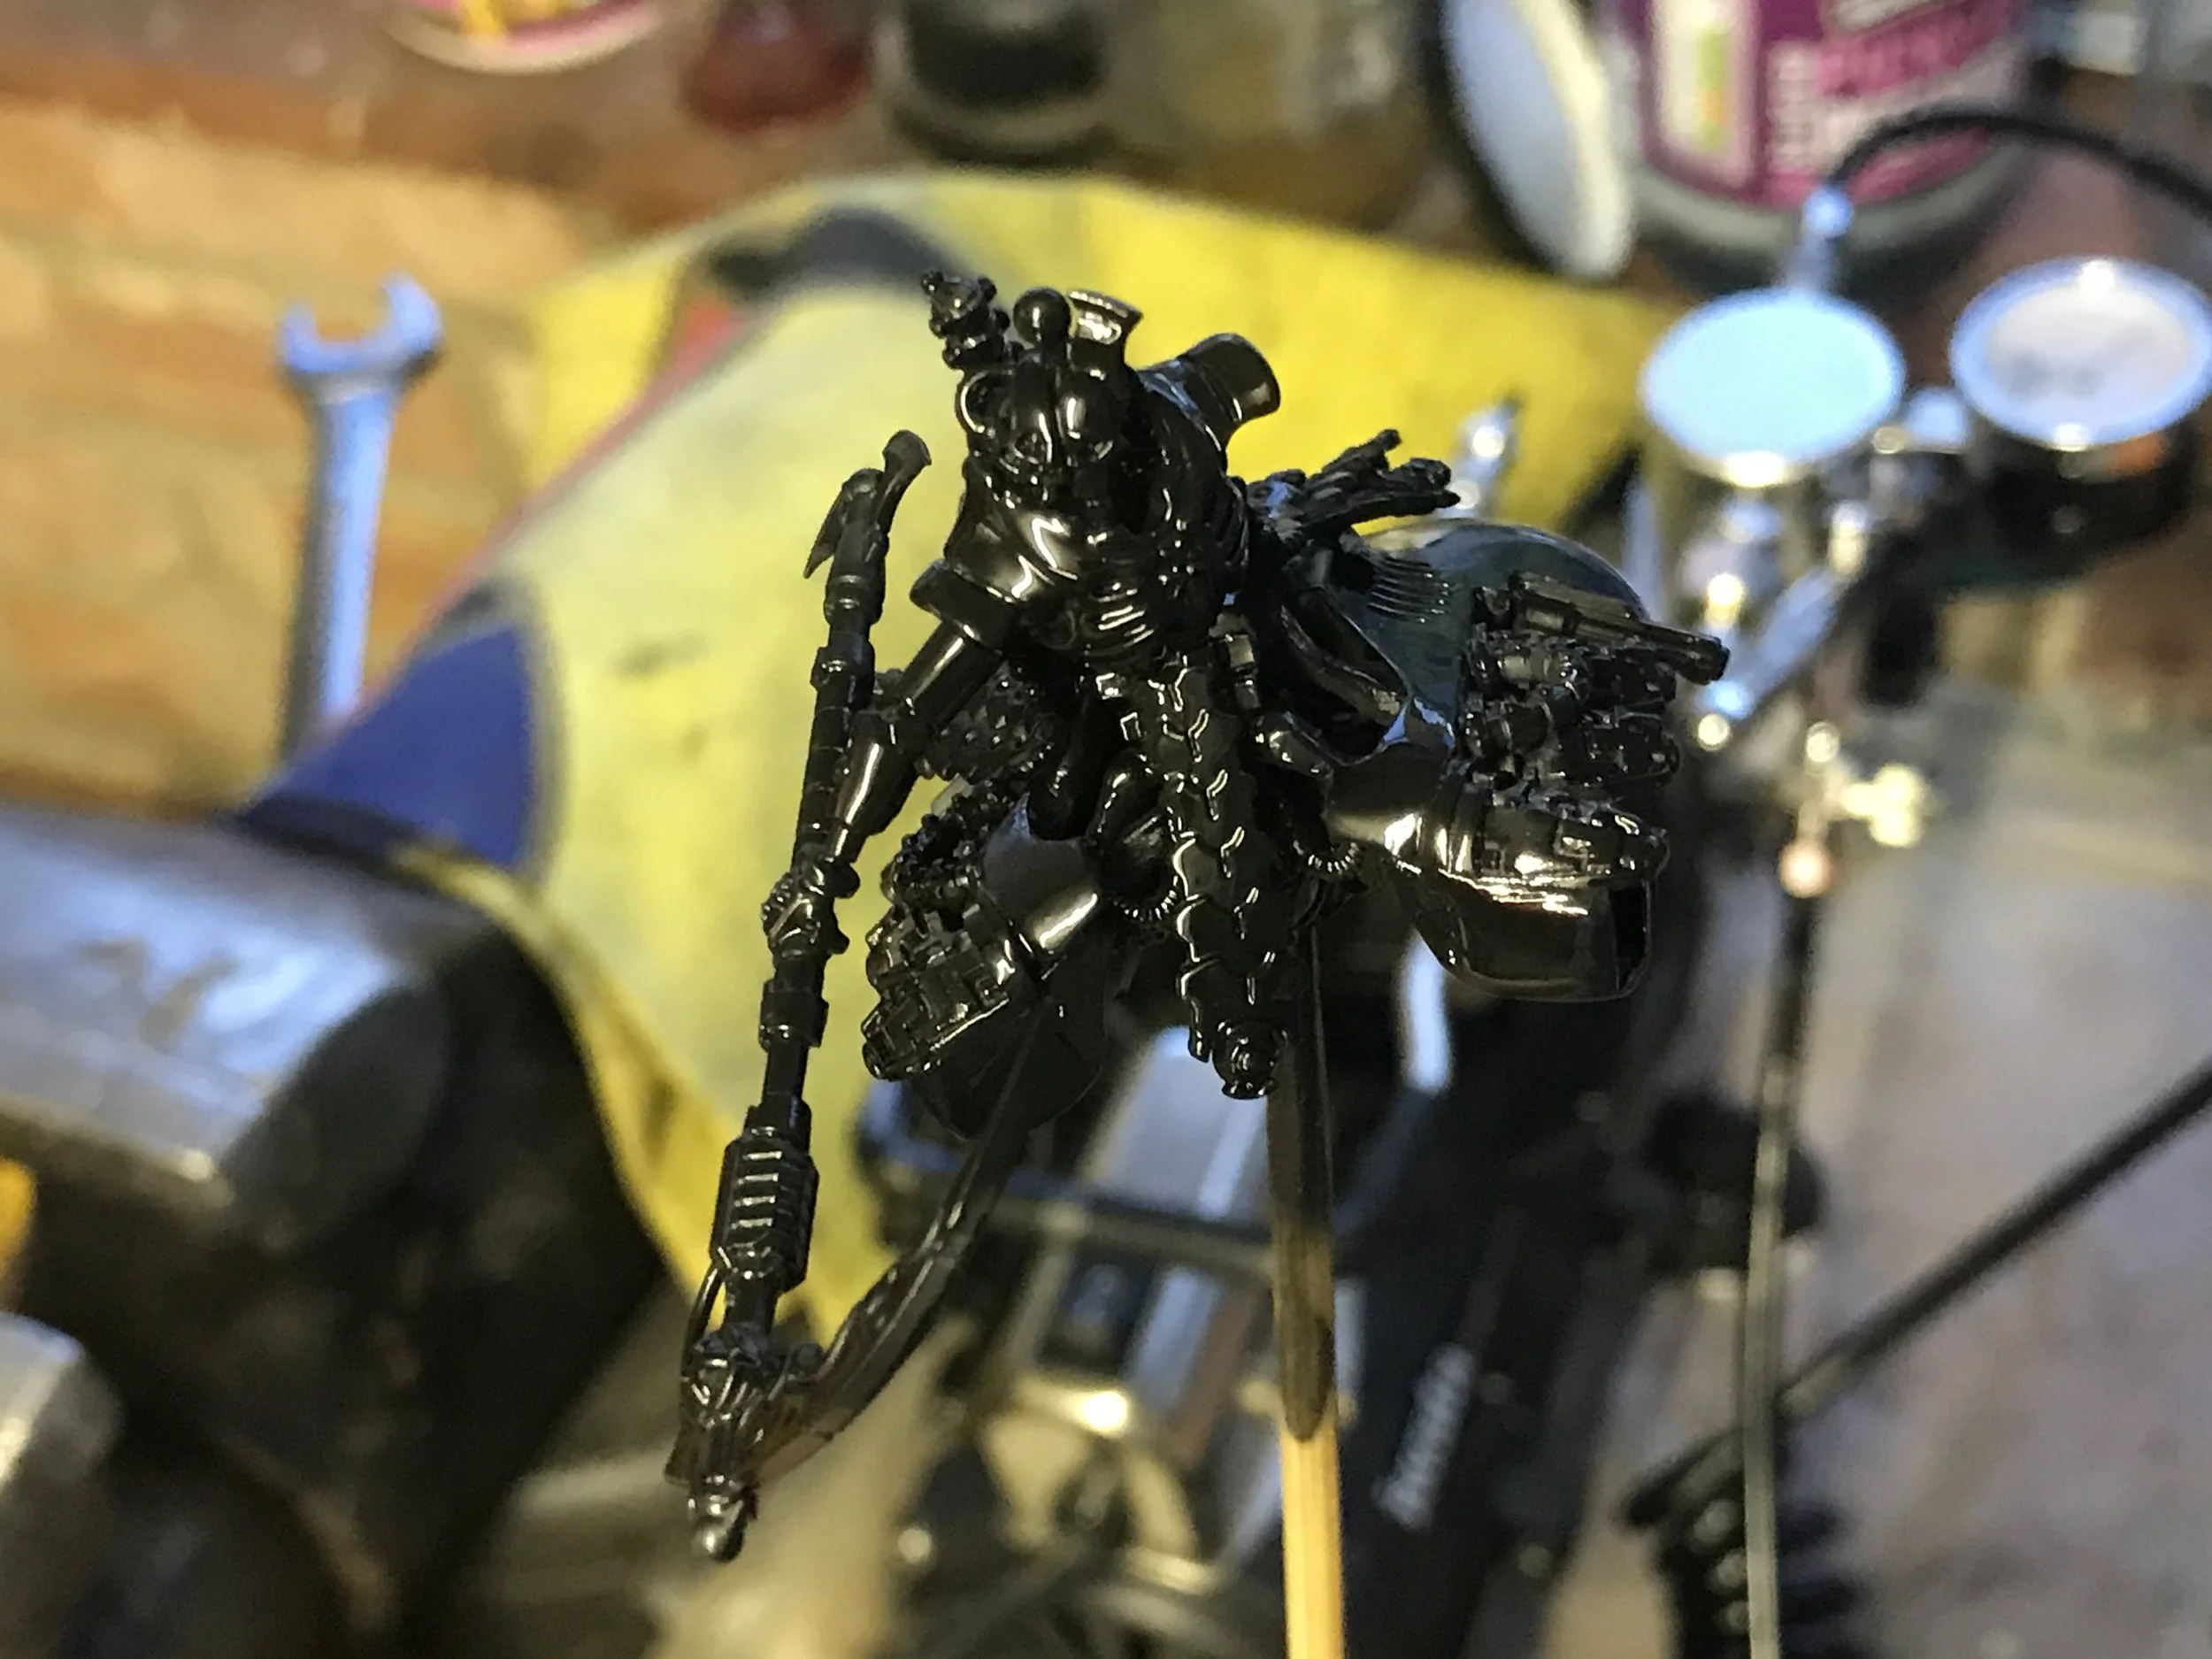
Here's the chrome applied. It's actually darker than it looks but it doesn't half reflect the light!


I LOVE the way that scythe looks in chrome. I can't wait to get some detail on there

And here's that rear section, again left until the last pass
Once the chrome had flashed the models have a quick coat of the lacquer and they're now being left to cure over night before that final highlight of chrome on the 'important' areas like the ribcage and head as I mentioned.

Here's the dual wielding Praetorian, too. Very John Woo!

Up on the paint table having an inspection before being put in the dust free cabinet over night
That's where the Destroyer Overlord is at. He'll be painted up along with the rest of the Armies on Parade force and then will be slowly taken to a level to enter in to the Golden Demon competition at Warhammer World in November. I'm starting to get a little impatient now, I really want to get some details and shading on all these models, their prep work is killing me!
While the chrome is curing fully I dig out some of my old putty to start doing two bases - one for the Destroyer Overlord and one for the C'Tan! I'll 'practise' with the C'Tan base and test a few of the ideas I have before turning my atttention to the hopefully show stopping Overlord!

Plenty of putty. There will be a LOT of scarabs on the bases, too. And skulls. Loads of skulls!
I'll keep you all up to date, as this little corner of the internet is helping keep me energised and excited about what I'm doing. Before I go, I'll leave you with one photo, a pic that highlights that I stumbled on a tonne of 'new' (well, they're new to me) army sculpts! They were nothing like this when I left the hobby. Suffice to say I fell down a HUGE rabbit hole of jaw dropping realisation that I really want them as my second army!

Dark. Eldar. Are. Stunning. Stunning. Sculpts. Wow.
I couldn't resist picking up the basic warrior box when I was at Alchemists Workshops on Monday and I was rather glad I did.
Until tomorrow, have a great day and I'll speak to you again very soon!
Chris
The Destroyer Overlord
What a thoroughly enjoyable day!
I headed over to Alchemists Workshops to catch up with the guys there and play Dave from Errant Wolf fame. He was heading up to see a friend and we'd loosely agreed to play a game at some point this week so why not link it all together and also pick up a couple of bits for my Necrons - more on that later!
The game was talked about and agreed weeks ago when I was 'persuaded' to enter Armies on Parade, something I'd never heard of and took a while to understand. If I have it right it's a collection of hobbyists showing off their armies at their local Games Workshop store. I still don't know if there's any awards going but I have agreed so a themed army idea had slowly formed over the last few weeks. The 90 power list consisted of some Tomb Blades, Destroyers, Destroyer Lords (one of whom was the subject of the last blog post, and may just pop up again later in this one!), a C'Tan and some Praetorians. It doesn't take a rocket scientist to realise they all have the FLY keyword, something that I thought as an army would look particularly striking on a 2' x 2' board at Armies on Parade.
Thanks to Alchemists Workshops, the rest of my army was delivered last week and I carefully got them together to assemble over the weekend in time for this game today.

Destroyer assembly line laid out

and the same with the Praetorians
All neatly cleaned up and assembled and packed loosely on a box before heading off up the M6. Yes, I need a carry case but that conversation is for another time!

Cannot WAIT to see all these chromed, detailed and based!
This was the first game of Warhammer 40,000 I will have played since third edition, so it was likely to be a lot of rule checking and flicking between data sheets but I was comfortably excited about rolling some dice and putting my fast, all flying Necron force on to a battlefield. But what was I facing? Seven Dreadnoughts, that's what. I was attacker in a Fate of Konor Mission and promptly set about trying to destroy three objectives defended by two Leviathan and five Contemptor Dreadnoughts. Errrrrm.

Serting up the chrome force as Dave started hiding all his Dreadnoughts. You can just make out his first one deployed in the ruin at the far left
The game mostly consisted of me flying around picking on one or two Dreadnoughts at a time and by turn five had managed to whittle them down to two.

The dilemma of turn three. Split fire on the two Dreads on low wounds or concentrate fire and guarantee one kill. I split fire... and failed!

By turn five the last two Dreadnoughts were hopelessly out numbered.
The game was a first victory for the Necrons under the leadership of Overlord Tarkeoch but he needed some attention. You can just about make him out on the right hand side of the photo above flying around with no head or arms. This is where he was left at the end of my last blog post and one of the boxes I needed to pick up while I was Alchemists was an Overlord blister pack.

This guy needed a Warscythe!
I had teased you with a half finished photo last time but here're some more of the details I added. The flowing cloak was from the Lord model from the Command Barge. Added a little heat from a cigarette lighter so it would bend and flow out behind him and help cover up a lot of the flat featureless Destroyer body.

The cape was added to with some Lychguard 'loincloths'. I was able to make it both longer and wider covering up even more and adding some invaluable detail.

Once I was happy with the robe/cape/cloak I turned my attention to the head. A few options were blutac'd on and the pic sent out to the Twitterverse for some feedback. Which one?

From left to right, Lychguard head, Necron Lord head and Destroyer head
Typically the comments were a combination of number one and three, but I was sort of leaning to those anyway, never the easy route!
A little patience and...

I'm hoping you agree that that is definitely a Destroyer Lord head
Now you're up to date the blister pack from today's trip could be butchered for the benefit of Mr Tarkeoch here.

Destroyer Lord and Overlord Sprue ready to be merged
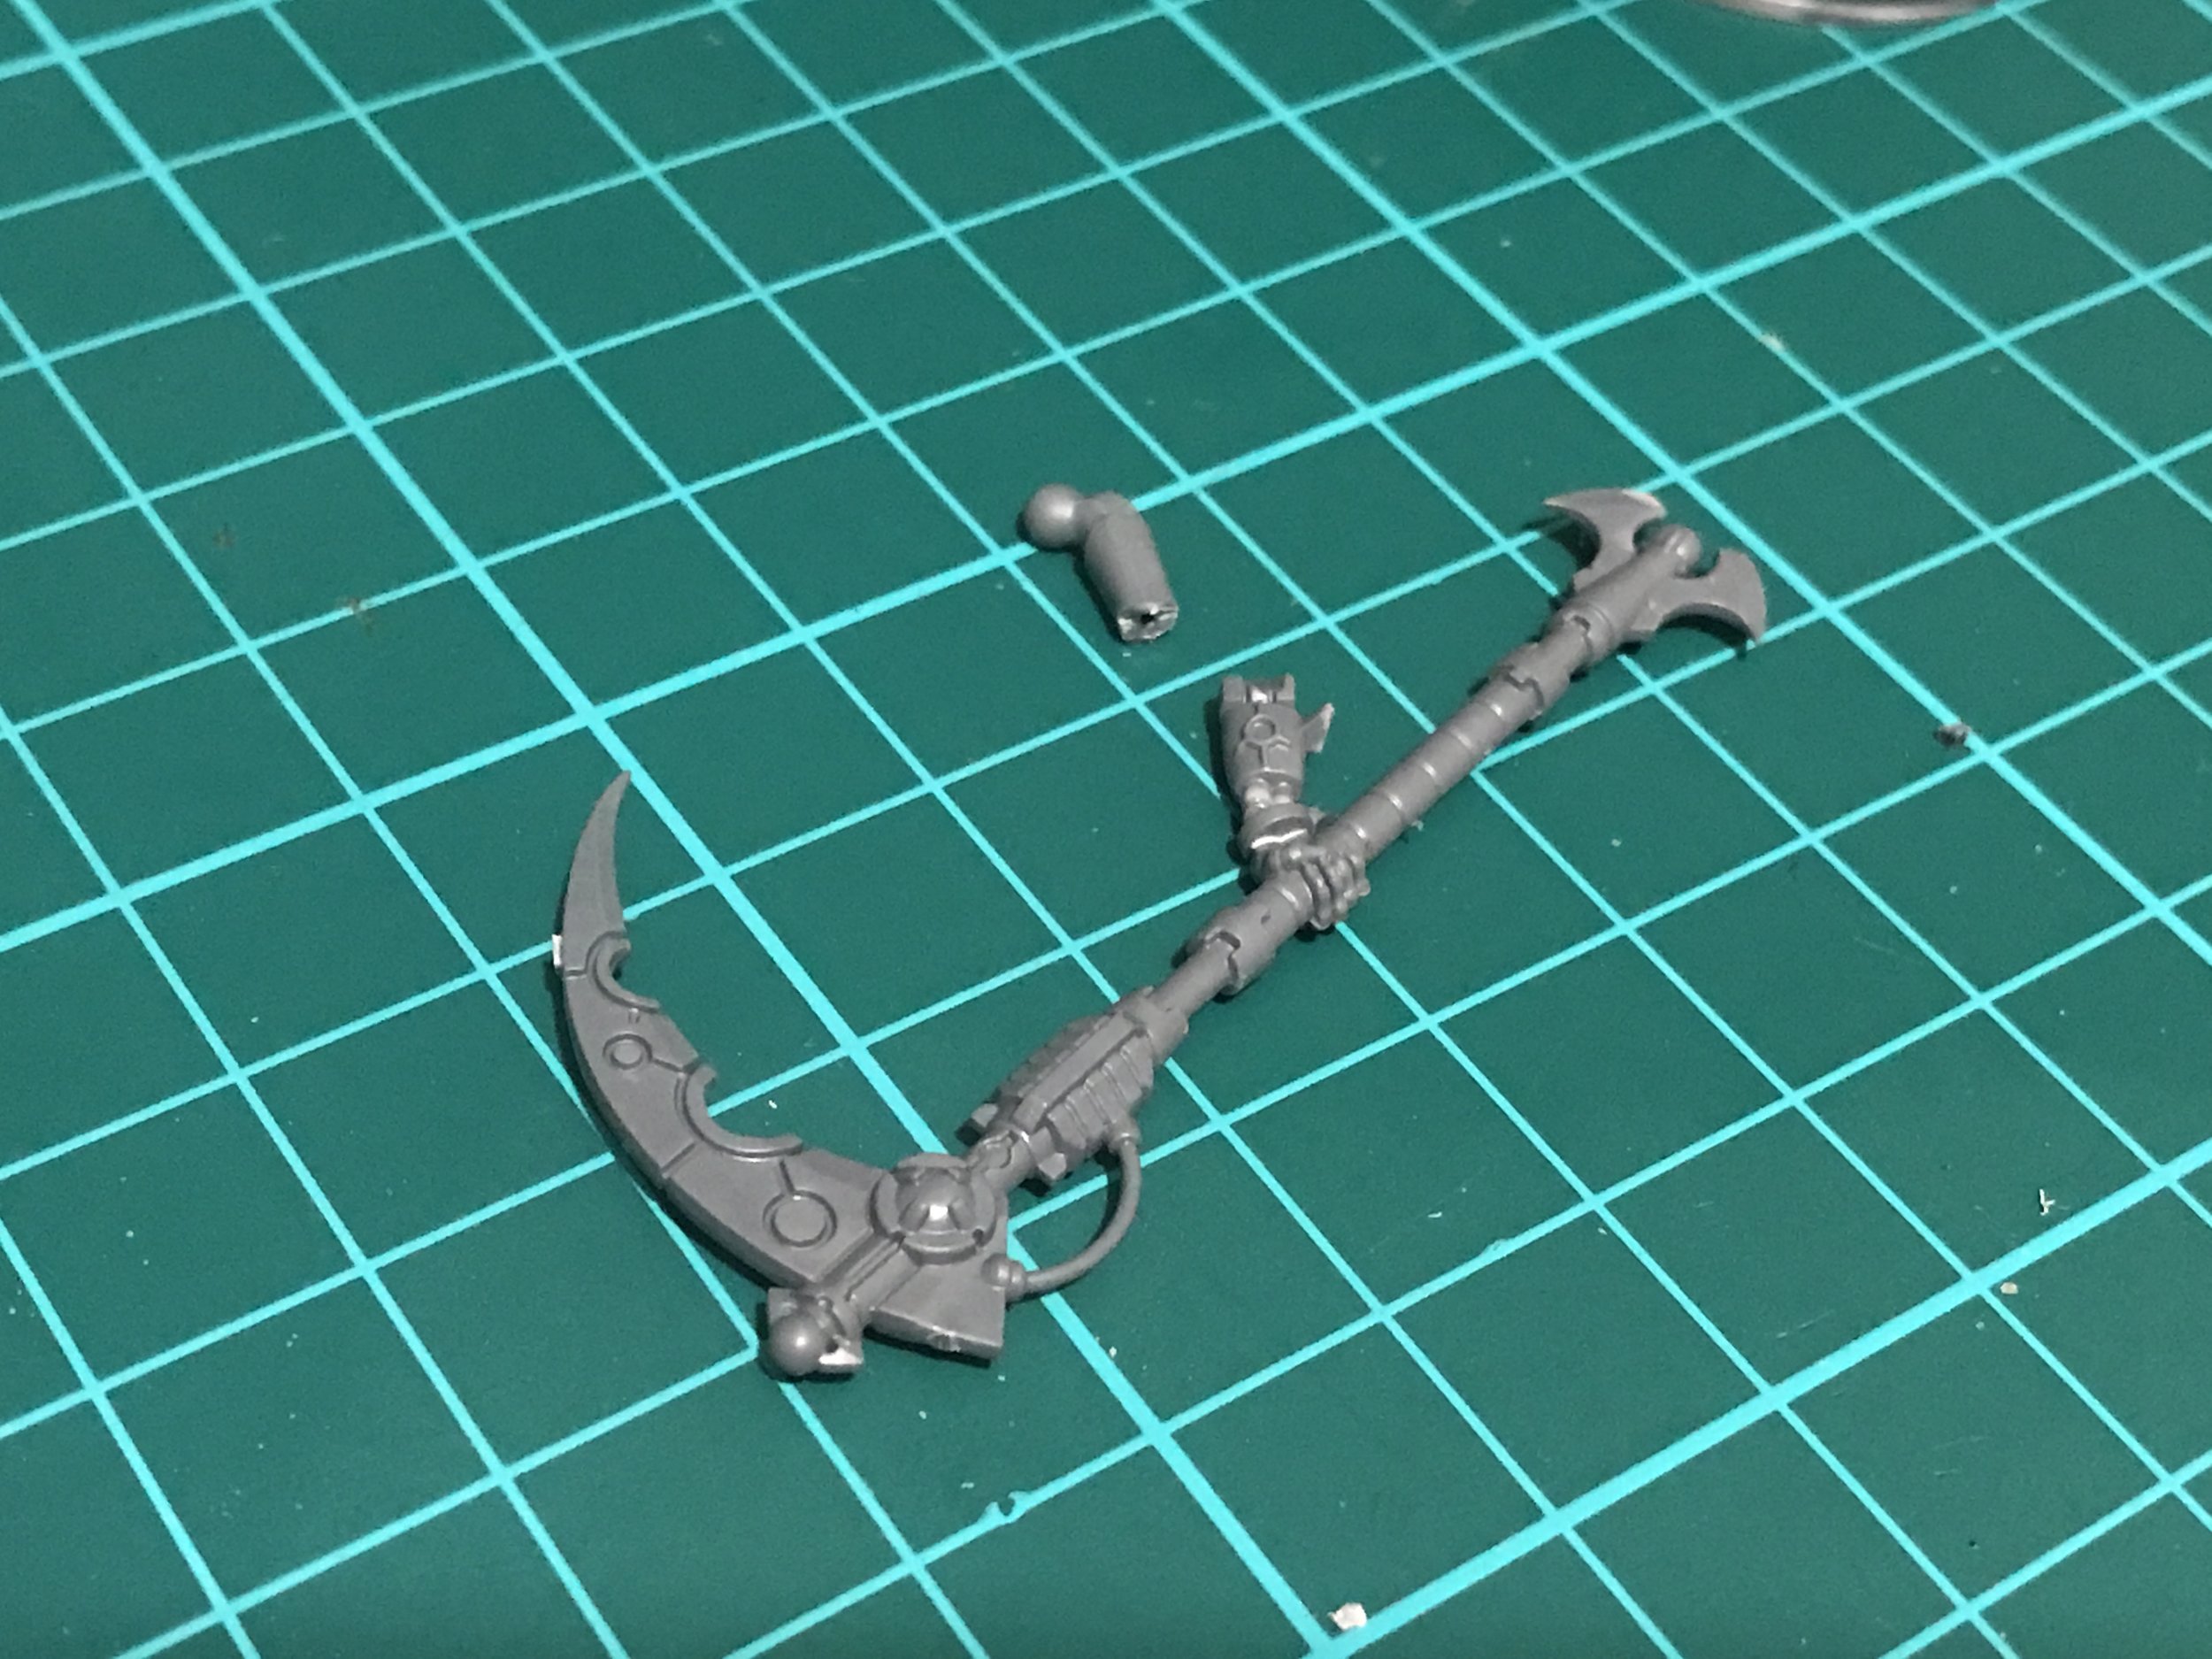
First up I needed to make an upper arm to fit the Warscythe forearm from the Overlord sprue. This is just a spare Immortal arm cut off and shaped to fit the elbow joint

And assembled

All the parts were blutac'd together to check the pose and balance of the arms and head before glueing

Warscythe glued on and supported while it dried
Now typically at this point I decided to make the build even more awkward. Just in case the Necron Codex came out and had some reeeeeally cool wargear options I decided to magnetise his left arm. The Ressurection Orb (or watermelon as it is now affectionately known) is cool but I didn't want to have a none WYSIWYG Overlord that I had to explain what wargear he had in the future. I knew he'd 99% have a Warscythe as the army is having a little themed nod towards the C'Tan Nightbringer throughout the whole army so black cloaks and scythes are very much 'in'!

A 3mm magnet glued in to the Destroyer Overlords' shoulder and a smaller 1.5mm ish magnet on the left arm that's holding the Ressurection Orb
That left arm is now perfectly ready to be future proofed against any awesome wargear that comes with the Codex. Maybe a Shard of Phalanx that allows him and <Dynasty> infantry within 6" to shoot twice once a battle for instance. If such a piece of wargear should turn up it'll be an easy swap!
And that's where I think I'll leave it today. That's a hell of a lengthy post and if you're still here I thank you for reading my ponderings, reasonings and general modelling madness with my Necrons. It's been a very VERY fun journey back in to the hobby and 41st Millenium so far and I'd like to thank all of you who have been involved in that; you've all made it so enjoyable and putting up with my undoubted tiresome enthusiasm has been very much appreciated. I'll aim to get all these chromed by the end of the week and an update when that happens will no doubt be pencilled for you.
Thanks again, and I'll speak to you all anon!
Chris


Placed on his 60mm base to check for size

Stand hole drilled at an angle to give him a little more of a dynamic pose. Now let's get him painted!
The Future is Bright
And it certainly will be bright when I can nail this colour scheme. It's looking good and I'm really pleased with it. The latest delivery from Alchemists Workshop landed yesterday so now I have all of my initial force here and being put together. As you will have read in the previous posts there were a number of models in the Necron range that I was REALLY excited about assembling, painting and having in my army. It doesn't take long to realise that all of those models were newer sculpts; the Tomb Blades, Annihilation Barge and the Night Scythes are gorgeous models and are all in my first 90-100 power army list. A list that I've basically formed around those favourite models. In my head the list should play very aggressively, and fast but I can't help planning which units will be added in next. But which?
I'm very excited about the possibility of a pre Christmas Necron Codex and along with wondering and coming up with rule and wargear ideas, I have been thinking about new sculpts.
The Necron warriors are rather dated now, having been released nearly twenty years ago with their basic 'squating' single pose and minimalist detail does nothing to hide their age. You've only to compare them with their fellow troop choice, the Immortals, to see the difference but also possibilities both model wise and within the rules. For starters it would be awesome if we could upgrade a model in a warrior squad to have a special weapon, or a Warrior Chosen that could then equip a Hyperphase Sword or similar. I'm just brain storming but that's what my head has always done, even when playing Tomb Kings back when we only had Ravening Hordes.
Speculating a little on which models may get some updated sculpts and my choices are most likely not very surprising at all. Warriors I feel have to be redone but the other models that in my opinion are looking a little dated are the Destroyers and... yes there's an and here... the Monolith.
I must admit to never really having liked to Monolith model, but in its alternative, the Obelisk, you can sense the possibility that a new sculpt could be phenomenal. I like the Obeslisk and given a spare £95 I'd happily convert one in to a Monolith if I thought it were worth it. A conversion would be made a little easier because it only has one weapon choice (an annoyance of mine throughout most of the army, a lack of wargear choice) but then you could speculate that that could be rectified with a new sculpt and a Codex. Gauss flamers anyone?
You could also convert warriors out of the later Immortal plastics if you so wished but the Destroyers? There's not really any 'easy' comversion work you could do with these outside something like a Canoptek Spyder with Destroyer parts spliced on to it.
All of this is irrelevant if new models come out, but I'm in a position where I'd rather not waste any more model purchases, I have just got to be patient.
Trying to future proof my next army choice is probably rather easy anyway. Just pick anything other than Destroyers, Warriors or a Monolith. Yeah, great I'll do that from now on, however my army already has twelve Necron Destroyers in one form or another, eight regular Destroyers, two Heavy Destroyers and two Destroyer Lords, and it was before I assembled my second HQ Choice, another Destroyer Lord, that I stopped and doubted it. If they release new Destroyers then I realise I would have to suck it up and replace them. I'm fine with that and there's no way I wouldn't get them. The models would no doubt be stunning and throw in the possibility of being able to take a Tesla Cannon or a Particle Shredder instead of/as well as a Gauss Cannon and you've suddenly made it essential to buy them. But the Destroyer Lord I was about to assemble could be considered a little differently?
I could take the easy route and put together the other finecast version I had bought but I never seem to pick the easy option and in the back of my head I hated the thought of putting him together and then him becoming obsolete in a few months when, hopefully, a new Destroyer Lord model is released. There was another option; convert one.
So that's the direction I went. If I converted one, even if a new model was released mine would hopefully be cool enough to still hold some weight and presence as a Destroyer Lord (or Destroyer Overlord... please Games Workshop? 2+ WS/BS Destroyer Overlord would be appreciated).
So that's where I went.

A Destroyer chassis and the Lord body from the Annihilation Barge along witha tonne of parts laid out ready
The easy part was getting a tonne of parts out and having a look to see what could be done. One of the 'issues' that I have with the Destroyer is the lack of detail across the model, something that is abundantly clear when you compare them to the Tomb Blade weapons shown in the photo above. The body and chassis look like blocks of playdoh in comparison and I wanted to address that with whatever I did. First up was the blocky Lego-like repulsor engines. The Tomb Blades Particle Beamer and Tesla Carbine added some options so I mocked them up.

Tesla Carbine and Particle Beamer bodies mocked up as reulsor engine cowlings
Hopefully you'll agree with me that the more pyramid shaped particle beamer body looks better as that is the option I went with and cut and cleaned up five more to fit on the chassis.

The way I glued the upper body on to the chassis also lengthened the whole model a little, too, and some Tesla cartridges were added in the gap just behind the engines. A spine from the Lychguard sprue was added for some finer detail at the read and REALLY shows up how blocky the original sculpt is. Just look at the difference between the two spines next to each other.
That's the engines taken care of in terms of some more detail, but that plain stark carapace across the top of the body is calling out for something. The Canoptek Spyder is a great example of what might happen with a possible Destroyer resculpt showing the Necron lines and runes separating the panels.

I certainly didn't think I'd be able to carve those lines in to the body, and I wasn't going to buy a £20 model just for the carapace either (although I did check eBay and all the usual bits websites to see if any had one in stock).
The other option would be covering it up.
And on that note, I'll leave it there as I've nattered on enough for tonight. Along with covering up the bland body there are some other options and ideas I am addressing as I finish up the Destroyer Overlord, a model that will hopefully be cool enough to hold its own against any future new models. Granted he'll probably still be relegated to a lesser Lord but hey, I can hope!
Until next time.
Chris
Chrome Croissants For Breakfast Is Where It's At!
You regularly hear from fitness wannabes that breakfast is the most important meal of the day. Well, I'm here to tell you that's mostly garbage. Breakfast in the sense of a bowl of cereal or some jam on toast at 8:30 in the morning isn't going to make you function any better than not having it. Think about breakfast as the first meal or nutrition that you put in your body after you wake up and you're getting nearer its importance. Breaking your fast with a good amount of protein and fat whenever you chose to have that first meal, be that 6am or 1pm, is going to stand you in good stead.
Last post I talked about taking a step away from the Necrons for a while, as creativity and doubt slipped in to my thoughts regarding their paint scheme. It was important that I realised that or I could have fought it with ill informed and spontaneous decisions which would have worsened the issue. It was important to be able to come back with a fresh set of eyes and look at the whole picture again, and it turns out that the most nutritious and beneficial subject to break your fast from Necrons is with croissants. Chrome croissants!
The Doom Scythe model was ordered at the same time as the Tomb Blades but the parts were just clipped from their sprues, lightly trimmed and assembled with no glue until I could address what needed painting when. After a week and a bit off from painting (that happily coincided with a tonne of photoshoots) combined with a couple more Shadow War games with friends, I came back and looked at the situation objectively.

Live Twitch stream of a little Doom Scythe assembly and planning
I cleared through in my mind which parts of the Scythe I could get away with assembling and which parts to leave off and paint separately. It was actually all very straight forward. The cockpit and pilot needed to be painted before the upper hull sections were glued in place and then the whole model could be chromed before the upper carapace was put on top. That part was going to be matt black to contrast with the chrome in the same way the C'Tan robes were blended down from chrome to black, too.
I did, however, have a thought about why I didn't like the Tomb Blades. There was too much chrome! And that doesn't mean that I needed more colours to break it up. I had completely covered every nook with the chrome paint when I'd airbrushed them and it was just too much. This time, I would be much more artistic and particular about applying the chrome.
Also, because I'd tried to hit every angle I'd applied a little too much and the models had started to lose their shine and gloss finish, it almost looked like I'd badly painted them with Stormhost Silver.
For the Scythe I was going to build the chrome up as if I were highlighting the gloss black base coat, leaving the black in the shadows and allowing the mind to be tricked in to seeing chrome of different shades everywhere. One of the best examples of this came when I sprayed the front sensor plate.
This effect of slowly building up the chrome on the high areas and leaving the Shadow side with the gloss black being the dominant colour changed not only how inthoight about applying the paint but ultimately the look of the models, too. I was so pleased with the look, and carried on the plan to the Destroyers.

Gloss black undercoat, again built up very slowly but hitting every crevice

The Destroyer Lord, where you can see the gloss black in the shadows already adding definition even before a black wash
A lot of the technique here was simply that I started thinking about highlighting the gloss basecoat with chrome, rather than having chrome as a basecoat, if that makes sense, so I was starting at an already contoured place rather than trying to add in shading and highlighting afterwards to a very difficult medium. Also building it up slowly kept the shine and avoided that horrible matt silver finish that I had ended up with on the 'Blades.
There was one more change I made, too. After the chrome there was a layer of clear cote added. The chrome is particularly susceptible to rubbing off and having played a few games with my Kill Team I was already seeing some wear on this, which actually looked rather good, but I would rather be in control of. After the clear cote I could then paint, shade and tint to my hearts content and maybe even varnish over the top again when totally finished.
The upper carapace had the metal parts dusted with some chrome and then taped off to receive the matt black base colour. This is as far as I've got at the moment and a weekend of photoshoots now will mean I will pick these back up bed t week, but I'm so excited to get them looking great. Armies on Parade is only a few weeks away now and I'm so much more confident in the striking look of my army! It's taken a while to pin down and finalise the style and look but I hope you'll agree that it's been worth it.
The Scythe and Destroyers after their clear cote

Here's the Scythe with the contrasting matt black upper carapace fitted
I hope you enjoyed this rather long walk through, thoughts and ponderings of my painting journey. There's a lot of techniques I'm remembering and it is feeling very much like voyage of re-discovery. That Doom Scythe is now firmly planted along side the C'Tan as one of the models that gets me excited about painting and my army. I've got this urge to sculpt some matching robes on all the characters in the force, too! Imagine a Destroyer Lord with a matt black hooded robe flowing out behind him ala Nightbringer. I think that would look simply awesome! As such, I put together a little test model to practice some sculpting on. It's been just as long since I scultped anything and a simple hooded robe will be a great place to jump back in. And I can use this as the new leader of the Shadow War Kill Team.

The Tesla Carbine is magnetised so he can swap it out for a Gauss Blaster if needed, both from the Tomb Blade kit
That, I'm sure, will be one of the subjects of a future blog post but for now, I thought I'd leave you with a video of me slowly building up the chrome on the Scythe.
Until next time, take care, keep painting and remember that if you take a break from something, find that that really excites you to get you back in!
Chris
The Fragile Mind
I'm used to this. But it doesn't get easier... at all! Let me explain.
I'm a photographer by day, photographing mostly cars for magazines and adverts. I'm used to going through creative ruts, struggling with doubts over my work and ideas. This process is easily summarised as;
- I am awesome
- This is tricky
- This is rubbish
- I am rubbish
- This might be alright
- This is awesome
- I am awesome
Horrible process and one that I can mostly deal with, snap out of and circumnavigate. Occasionally though, maybe due to nutrition, sleep, peers doing jaw dropping work, or a combination of all three, it's hard to drag yourself out of the rut. When this happens to that extent I have recently just removed the blockage and concentrated on other things. Luckily I have a lot of projects and ideas and a few hobbies that I can indulge or lose myself in and I use the inspiration and energy they create to bounce back refreshed. It's not procrastination, more an energetic attention venturi (oooh, I like that!) and it does work. Good nutrition and sleep also does wonders, but where's the fun in that.
This is what happened with the Tomb Blades.
The models weren't out back when I painted that first squad and they quickly became something of a core that I wanted to build my army round, they were so cool. Once I got the Kill Team mostly painted I ordered two boxes for a total of six Tomb Blades from our friends at Alchesmists Workshop.
I wanted to magnetise all the weapon options (again, something that wasn't in the hobby all those years ago) and also just adjust their stance. You see I didn't really like the 'nearly tipping out of the front of the blade' look that they have as standard.

Step One
There's very little that actually needed to be changed to have a sleeker speedier looking version, turning the engines round so they faced backwards and mounting the weapons up front!


Much cooler in my opinion! Drilled a hole where the new stem would mount and set about doing the rest. Damn they're fiddly once you have to do six!

But they went together really well once I'd done a few and with just the few tweaks I definitely thought they looked better than standard and I excitedly planned an afternoon to get the chrome paint on. The paint needs a very good smooth finish to go on well and I unfortunately put it on a little heavy. They turned out ok, but I knew I had to do my best to add the colours and details really well to bring them out.

The chrome dries very quickly but it's a little delicate to the touch until it's lacquered. The little kebab stands helped with handling them
I still thought they were cool models so hoped that adding the blue and some black would bring the models together.

The Immortal sitting on my painting desk as inspiration, trying to find the right balance for the 'Blade
Meh. Wasn't really working. I started blacking out some details and still wasn't really working. The colour scheme is so simple in my head it was just difficult to translate to the miniature. It was getting me a little fed up. The whole army was in jeopardy; these were supposed to be the core of the force and if I couldn't get these looking right it would all be for nothing. In my head anyway.
I tried a few different looks but did not want to sacrifice any of the look that I'd envisioned. So I took them off the table for a while. Turned my attention to my favourite model in the Necron army.

I suppose it's lucky that there's a model this gorgeous to distract me while I finish off the Shadow War Kill Team.
Next time, though, we'll talk about the journey back to being thoroughly excited about painting them again, and it was all down to these guys!

Destroyers and a Scythe! Find out why I have 8000 grit sand paper on the scythe in the next post. Until then, have a great week, and let me know what you're all working on. Would love to see all your progress too.
Chris!
I Chrome Therefore I Am
I'm back! Apologies for my absence. I've had a tonne of work recently and also... had a little 'meh' moment about the Necrons.
Firstly, let's pick up from the last post when I'd got the chrome basecoat done on the Shadow War kill team. After that had been sprayed on I started the experimenting. I knew I wanted a coooool blue feel to my Necrons. Icy. Soulless. Plus, most of my old armies were red; Orks, Tomb Kings, Khorne. Blue'd compliment the chrome perfectly - at least in my head. That's where the experimenting started.

Neat application of gloss nuln oil
The first time I did this colour scheme I was very liberal with some application of the old Black Ink. Liberally applying it to the warrior test model dulled the chrome down just a little too much for me so I applied it a little more accurately on the next model - the Immortal and Deathmark pictured above. Then some blue experiments. That started with Drakenhoff Nightshade to give some hints of blue.

The Drakenhoff wasn't 'blue' enough
It was a strange application. I added it carefully to some recesses - rib cage for instance - and some flat areas to see if I could cool the chrome down in colour to give a hint of blue to some of those areas. Over the chrome the washes stained the chrome a little but the Drakenhoff wasn't a rich enough blue to really show up and change the look and style of the Necron enough. So I tried a paint that was totally new to me Soulstone Blue technical paint. Wow!

The richness of the colour came through and started to get the rich blue look I had in my head. The strange stains on the shoulder pads are the remnants of the Drakenhoff but that lovely bright rich blue on the chest plate and the gun cartridge is exactly the blue I was after. Lucky coincidence? Maybe but I'm now love these new gem paints! And what better silver to paint them over the pure chrome!
The blue was quickly applied to the rest of the Kill Team just in time for their first game. This was the first time I'd rolled dice in anger, as it were, in over ten years, and although we were playing slowly and checking rules a lot it felt familiar and very exciting.

Necrons v Harlequins v Adeptus Mechanicus
I was hooked and wanted to put together and paint some of the new models that I'd never seen before. Tomb Blades. They'd form the core of a fast attack Necron force for the new edition of Warhammer 40,000.
The plan was to create a themed army for an event that Dave had told me about called Armies on Parade, something I'm sure you all know about but was totally new to me. I always like working armies out according to the lore behind them so the idea of fast attack scouting or strike force for my upcoming Necron army was forming.
I'll leave the blog post here for now, with a few more photos of the Immortals as the Tomb Blades are where my excitement started to falter just a little.

I tried adding a couple of spot colours to the scheme to see how they looked - and would also double to differentiate the models in the Kill Team
Oh... and one more thing... I blended chrome to matt black on one of my favourite models ever, and the reason I bought that first squad of Necrons the first time.


Until next time, I hope you're having a great bank holiday weekend! I'll be painting some more tomorrow and hopefully write another post to bring you right up to speed with the ups and downs that the Tomb Blades introduced.
See you anon!
The Plan. Everyone needs a plan!
I'd started writing a post about how social media has changed so much of the hobby while I'd been away and how amazing some people I'd met on Twitter have been to me in such a very short period of time. However, I remembered that I promised you in the last post that I would break down my plan for the colour scheme. So, Gav, Dave, Debbie, Sophie, Alexa, Rob and co will have to wait for their shout outs.
In the last post I left you having bought a box of Immortals and Deathmarks. I had agreed to get a small kill team together for a three way Shadow War Armageddon campaign against some Harlequins and Ad Mech, and this gave me the perfect chance to try a colour scheme that I had in mind.

Immortal, Deathmark and Warrior for my kill team
When the plastic Necron warriors came out all those years ago it coincided with an article I read in a modelling magazine (Finescale Modeller I believe, a US magazine that I had imported every month) that was testing a new chrome paint. It was a very thin lacquer, sprayed from an airbrush over a gloss black basecoat. I picked up a box of warriors to see how this chrome finish looked on the scale of these robots compared to the aeroplane fuselage that the paint was designed for.
They turned out just the way I hoped, and a neat wash of Black Ink added enough contrast in the shadows to make the chrome really pop. The green gauss rods in the guns and basing them with a red 'Mars' theme made them look really smart.
This was the colour scheme that I wanted to use but with a few tweaks. My photographs have a cool blue feel to them because of the way I edit the images and I wanted to cool down the chrome, too, to give a more chilling feel and look to the finished models. There would be no red base, either, but there would be blacks. Matt blacks. And with the idea in my head that I wanted this cool blue to extend to a power source glow of some sort it wasn't a large step to start thinking about changing the gauss rods to blue, too.
Now, the challenge to all this was putting the image and ideas I had in my head on to the models, and with all of the paints I remember being renamed (Black Ink... Deadly Nightshade?) this was going to need a lot of experimenting to find the perfect technique. I'm not going to lie, I was a little worried about finding the right paints and balance to make it work.
First thing up was putting the models together. With the Deathmarks being the assassins of the Necron force, I had a funky idea to convert the model for my kill team to match the pose of the classic Vindicare Assassin so he ended up looking like this, rather cool in my opinion!

My Deathmark 'Vindicare' Assassin
A couple of Immortals were posed up and glued together before a leader was converted out of a regular immortal, some Preatorian bits I bought and a destroyer head that I had found. The gun was trimmed just like the Deathmark above, so it was held one handed, leaving the other hand to point a combat blade out in a menacing way! A leader has to be pointing, right!?
With all the models now assembled I just excitedly waited for a new airbrush compressor to arrive; I'd ordered a Iwata Sprint Jet for a crazily good price and thankfully the seller sent it next day delivery which meant that... I could get some paint on these and start developing my colour scheme.
First up, gloss black primer.

It's really important with this that you put it on thinly and slowly. Anyone who knows me will know I have oddles of patience but building up paint on models slowly certainly my tests that. It's so exciting seeing the paint build up that you can so easily pull the airbrush trigger back too far to see the paint build up quicker. I resisted, and finally ended up with all six primered.

The keen eyed readers will notice another model there, too! More on him in a later post!
The gloss black gives the perfect shiny base to sloooowly build up the chrome lacquer on. After I'd patiently let the primer fully cure over night (I know that's not 100% necessary but I was determined not to make any mistakes, so I waited) I transferred some of the chrome lacquer to my airbrush, turned the air flow down to around 12 psi and took a deep breath through my mask.
Boom!
Chrome!

The only downside to these is they are so difficult to photograph as they're so reflective and shiny an iPhone just can't cope. Here's the best I could do and this is where I'll leave this post. Next up I'll discuss the shading, colouring and staining that I have developed and decided upon for the final colours.
Until then, drop me a follow on social media. I'm always on Twitter but you can find me anywhere as @ChrisFrosin, there's only one of me, so I'm easy to find.
Thank you for reading, and I look forward to speaking with you and showing you more of my journey very soon.
Chris
The chromed Necron warrior with the first bit of shading around the chest and my custom Gauss rods
History of Egypt
The last post on this little section of my website spoke briefly about how a catch up with a friend had resulted in me falling down a rabbit hole I knew only too well. This one attempts to tell the story about that rabbit hole, so bear with me as I reminisce... as briefly as I can.
Back in my early teens I enjoyed converting and painting models a little more than I did playing. The first model I painted was a Terminator for a friend in his chapters colours (Ramsmarines if you're curious, after Derby County... hey, we were young). I'd convert individual models and paint them up but it didn't take me long to start on the Orks; in my opinion one of the most enjoyable races to paint in the game. And also, anyone who knows Orks understands that adding to and collecting an Ork army doesn't stop. It just doesn't stop. And boy could you convert forever. I remember converting an entire Ork Blood Axe Kommando squad for Golden Demon out of the Blood Bowl blitzers and Varag Ghoul-Chewer (best Ork name ever). However, with 40K rule changes, Orks slowly led to Orcs as wyverns, spiders and piles and piles of Night Goblin fanatics became more interesting! And sooo much fun to paint. Now I know there's a distinct lack of photographs so far in this post and I promise to rectify that in due course but camera phones weren't around much in 2000. To get to the photographs, however, is straight forward and needs one simple book.
Ravening Hordes.
This brief booklet was ultimately a 'stop gap compendium' until official army books could be released for the new edition of Warhammer. And it opened the flood gates. Flicking through the pages there were some armies I'd not heard of before, one of which, a cliché I know, but would change my Warhammer experience. There were a couple of sketches on an army page full of cool regiments like Skeleton Chariots that portrayed skeletal warriors plastered with Egyptian iconography - Tomb Kings.
Put aside the awesome Egyptian mythology or the poisonous asp arrows that the skeleton warriors could fire, this was an army that I HAD to convert most of the models for as they didn't exist. Carrion? Chariots? Skeleton Archers? It was heaven. And ultimately led to my very unique and individual Tomb King force and one that I do have some photographs of.

Four unique warriors from my infamous Tomb King army
I may even share some more photographs if you ask nicely, but these models were always so dear to my heart that I do regret moving them on in my hiatus away from the hobby.
Imagine then, that when I get enticed back and watch a game of the new Warhammer 40,000, see all the dice rolling and Marines dying, that I want a little part of my Tomb Kings back. I've spoken on another blog as a guest post (Debbie Rushby's Blackhand Marines) that having done the whole mass infantry Ork army I was keen to go the other way and find a small elite force that I could build quickly. There is an army in the 40,000th Millennium, in fact they've been around for longer than most any other army, that mirror the Tomb Kings; at least if you squint a little. The Necrons.
When the first plastic Necron warriors were released all those years ago I did a test colour scheme and as the Aeldari (not got used to the new namings yet) were desimating a Space Wolf force I was wondering if I could start these up again and perfect that colour scheme. And then, stupidly, I looked at the models.
!!!
Hands down some of the coolest models in the game right now, and I hadn't seen about 80% of them. Tomb Blades, new Wraith models, an Annihalation Barge which just sounds cool, and then there's the Triarch Stalker! (Oh and don't even get me started on Forge World!)

Now the benefit I have over you here is that I know the colour scheme I'm going to use, but that's for the next post. I needed some models to experiment and play around with the colour scheme so between gym and photoshoots I had a walk down to my local store and picked up...

A simple way back in would be a game of Shadow War Armageddon and a small Necron kill team.
I'll leave this post for the moment as it's now quite late but I'd just like to say thank you to all the positive comments and conversations about the last blog post. This is going to be a lot of fun to write and so much has happened in such a short amount of time that I can't wait to tell you all about it. I'm not going to let these models get away with not being photographed like some of my other armies and models.
Next time... the colour scheme!
Until then, have a great weekend and come to say hey on Twitter.
Chris
Naming your little corner of the internet
It's been a funny old few weeks. I've photographed some incredible cars, travelled all the way down to Brighton to help chop some trees down for a friend who has broken his arm, pulled my longboard out of hiding because, well why not, longboards are awesome to ride, and... there was something else... ah yes, caught up with a friend I hadn't seen in years and ended up being tempted back in to the world of Warhammer 40,000.

My friends were playing 40K and I was obsessed with this table top next door! HAHA
This was about a month ago, now, and I've tumbled down a glorious rabbit hole. I'm a photographer by day so I'm regularly posting rubbish all over the internet. This little corner of the internet, being my website and full of images of the cars I photograph, will now also include a little hidden page. This page. It'll be my little place to write about my journey back in to a hobby that I left over twelve years ago and had slowly sold all my armies.
Coming back at the time I have seems to have had a little 'good timing' to it. As it turns out the 'new' edition of Warhammer 40,000 landed two weeks before I had my catch up so I was getting excited about the possibility of slowly building up an army. The choice may well have been given away with the 'temporary' title to the blog but you'll have to wait to find out exactly why I lent that way; that's for the next post.
THIS post is about trying to figure out what to call the page. I've not 100% decided what it's going to be called but I opened it up to Twitter and had some fantastic suggestions, my favourite being C'Tan Chatter and Chris' Chrome Corner! It's currently called Tales from the Crypt, but if you have an idea for a cooler name then let me know. Some of the best ones are listed below... the first being a link to the army I was most famous for in my earlier days.
Tomb kings ... in SPAAAACE!, Frosin's Fantastic Features, Musings of a Metal Man, The Frosin Wasteland, The Hobby Hall, Pages McPageface, Painting and Poetry - Necron Arts from the Past, Trazyn's Infinite Halls of Hobby, C'tan sprues... get it?? Cuttin!!, Nearly Ninety Thousand Necrons Later, Chris's Chrome Corner, Trapped in a Hobby Tesseract, Blue Chrome and Dancing Elves, Tales from the Chris, Necron Noises, Hobby Horse, Necron Natterings, You C'Tan do it!!, Fabulous Frosin's Finally Finished Fell Futuristic Flying Foes (WHAT?!?!)
So that's a quick post done to introduce you to this blog. I will no doubt pen the next post pretty quickly so I don't leave you in limbo for too long but... oh go on then, here's a sneak peek!

I managed to find ONE model that survived the clear out. Excitement level can continue
Well now you've got an idea of where I'm heading but the history of why and how they're going to be done has the potential to be a rather more interesting story. And it's one of those stories where you wish you had an iPhone fifteen years ago when you came up with the original colour scheme. It'd just be nice to have photographs of them.
I shall rectify that from now on, though, as I DO have an iPhone and, being a photographer, an awful lot of cool lighting kit and lenses to give these little metal terminators a little attention.
Thanks for reading, and if you want to follow me anywhere else – Twitter for instance – I'm easy to find. Just search Chris Frosin on any social media platform you fancy and I'll probably be there. Twitter is the best place to catch up with me, however, and will be where I let you know about these posts.
Until that time, I'm going to get a cuppa and some cake. Speak again soon
Chris